

How to Make Flat White Coffee at Home
So, you want to make a proper flat white. It all comes down to two things: a perfect shot of espresso and silky, expertly steamed milk with that signature microfoam texture. This guide will walk you through exactly how to master this beloved coffee right in your own kitchen, using insights from the UK's vibrant speciality coffee scene.
Bringing the UK's Favourite Coffee Home
The flat white is more than just another coffee; for many, it's a daily ritual in cafes from London to Edinburgh. But what if you could recreate that perfect balance of rich espresso and velvety milk yourself?
This guide is your personal invitation to do just that. We'll go beyond the basic instructions and get into the craft, sharing the small details that turn a good coffee into a great one. Forget intimidating barista jargon—we're here to make the whole process feel inspiring and, most importantly, achievable.
This drink has firmly cemented its place in the UK's thriving coffee scene. It's a standout favourite, especially for those who prefer a strong, milk-based coffee over simpler options. This popularity is part of a wider trend where 80% of Brits visit coffee shops weekly, and a dedicated 16% pop in daily, often for specialty drinks like the flat white. You can discover more insights into the UK's coffee habits and see just how popular this drink has become.
A Ritual Worth Mastering
Learning to make a flat white at home is about more than just saving money on your daily cafe visit. It’s a chance to slow down and get hands-on with a rewarding, sensory process. It connects you to the whole journey of your coffee, from the independent UK roaster who sourced the beans to that final, satisfying sip.
Before we dive into the method, let’s quickly break down what goes into a truly authentic flat white. It’s all about getting these core elements right.
The Anatomy of a Perfect Flat White
A quick overview of the essential components required for an authentic flat white experience at home.
| Component | What You Need | Why It's Important |
|---|---|---|
| Espresso Base | A double shot of high-quality espresso. | This provides the rich, intense coffee flavour that defines the drink. |
| Milk | Whole milk is best for a creamy texture. | It creates the smoothest, most stable microfoam for that velvety mouthfeel. |
| Microfoam | A thin layer (around 5-10mm) of silky, paint-like steamed milk. | Unlike a frothy cappuccino, this fine foam integrates perfectly with the espresso. |
| The Right Cup | A 150-180ml (5-6oz) ceramic cup. | The smaller size ensures the ideal coffee-to-milk ratio, keeping it strong and balanced. |
Getting these four things in sync is the secret to moving beyond a simple milky coffee and creating something truly special.
The real magic of a homemade flat white lies in the control you have. You choose the beans, you perfect the milk texture, and you create a drink tailored exactly to your taste. It's your personal coffee ceremony.
Embracing this skill opens up a whole new world of coffee appreciation. It allows you to:
- Explore Flavours: Experiment with different single-origin beans from UK roasters to discover unique tasting notes, from nutty and chocolatey to bright and fruity.
- Develop a New Craft: The hands-on techniques of pulling a great espresso shot and steaming milk are deeply satisfying to learn and perfect.
- Share with Others: There's nothing quite like serving a beautifully made flat white to friends and family, sharing a piece of your newfound passion.
Choosing Your Tools and Ingredients

Your journey to the perfect flat white starts with getting the right setup. This isn’t about having the most expensive kit, but the right kit. Think of great tools and ingredients as the foundation for learning how to make a flat white that genuinely rivals your local café.
The essentials are pretty straightforward: a reliable home espresso machine with a steam wand, a quality burr grinder, and a stainless steel milk jug. A machine with stable temperature and pressure control is a huge advantage, as it helps you pull consistent, repeatable shots every single time.
A common mistake is investing in a great machine but skimping on the grinder. Your grinder is arguably more important—it dictates the potential flavour you can actually get out of your beans.
Selecting Your Coffee Beans
Sourcing your coffee from one of the UK's incredible independent roasters will make a world of difference to your final cup. When you’re choosing beans, look for a medium roast to hit that classic sweet, balanced flavour profile we all love in a flat white.
- Single-Origin Beans: These are brilliant for exploring distinct flavours, whether it’s the rich, chocolatey notes of a Brazilian bean or the bright, fruity hit of an Ethiopian one.
- Espresso Blends: Many roasters create special blends designed to produce a rich crema and a well-rounded shot that just works beautifully with milk.
Freshness is everything. Always buy whole beans and check for a recent roast date on the bag—ideally within the last month.
The Best Milk for a Flat White
The milk is every bit as crucial as the coffee. Its job is to create that signature velvety microfoam, and that requires the perfect balance of fats and proteins.
For dairy drinkers, fresh whole milk is the undisputed champion. Its fat content (around 3.5%) is absolutely perfect for creating silky, stable foam that’s a dream to pour. Semi-skimmed can work, but you’ll often find it gives a much thinner texture.
In the modern UK coffee scene, oat milk has become a real staple. If you want a fantastic plant-based flat white, always go for a barista-grade oat milk. These special versions are formulated so they won't split when steamed, producing a texture that performs almost identically to whole milk.
Pulling the Perfect Espresso Shot

Let's be clear: the very soul of a great flat white is its espresso. This is the foundation you're building everything on, creating that rich, intense base for the velvety milk to wrap around. It’s about more than just hitting a button; it’s a hands-on craft to create a syrupy shot with a stable, hazelnut-coloured crema.
Making a great flat white at home really begins here. The goal is to nail a balanced extraction. That’s when the water pushes through the coffee grounds at just the right speed to pull out all the good stuff—the sweetness, the body, the complexity—without any of the sour or bitter notes you want to avoid.
It all starts with your grind. You’re aiming for a consistency that feels like fine table salt. If it’s too coarse, water will gush through and give you a weak, disappointingly sour shot. Grind it too fine, though, and you'll choke the machine, resulting in a bitter, over-extracted coffee.
Dialling In Your Recipe
A fantastic starting point for most home espresso machines is a simple, reliable recipe. Think of it as your baseline—a trusted formula you can tweak as you go. Getting a great shot is a game of precision and consistency.
Here's a tried-and-tested recipe that baristas across the UK use as their guide:
- Dose: Start with 18 grams of finely ground coffee in your portafilter.
- Yield: Aim for a liquid espresso output of 36 grams in your cup.
- Time: The entire extraction should take between 25 and 30 seconds.
Once you’ve dosed your coffee, make sure to distribute it evenly in the basket before tamping. A firm, level tamp is absolutely crucial for forcing the water to flow through the coffee puck evenly.
Remember, this is a starting point, not a strict rule. Different beans from different UK roasters will behave uniquely. Don’t be afraid to tweak your grind size slightly finer or coarser to hit that 25-30 second sweet spot.
Troubleshooting Common Espresso Issues
If your espresso isn’t tasting quite right, a few simple adjustments can make a world of difference. Once you understand what causes certain off-flavours, you can start fixing them with confidence.
Does your shot taste unpleasantly sour or acidic? That’s a classic sign of under-extraction. It means the shot ran too quickly (under 25 seconds). The fix is simple: make your grind size a little finer to slow the water down.
On the other hand, if the shot is overwhelmingly bitter or harsh, it's over-extracted. This happens when the shot runs too long (over 30 seconds). To sort this out, you’ll need to make your grind size slightly coarser, allowing the water to pass through a bit more easily.
Creating Velvety Smooth Microfoam
This is where a flat white truly comes into its own. Forget the stiff, bubbly foam you’d find on a cappuccino; we’re chasing something best described as ‘liquid velvet’. Honestly, learning how to make a great flat white at home is really an exercise in mastering milk texture. The goal is a perfectly integrated, glossy microfoam that feels unbelievably luxurious.
The whole process is a sensory one—you need to use your eyes, ears, and hands. To start, grab your milk jug and fill it no more than halfway with very cold, fresh whole milk. This is crucial because it gives the milk enough room to expand and, just as importantly, gives you enough time to work your magic before it gets too hot.
The Art of Stretching and Spinning
The magic really happens in two quick, distinct phases: stretching and spinning. First, you’ll introduce a tiny bit of air into the milk. Then, you’ll focus on creating a whirlpool to break down any bubbles and fold that air into a silky, seamless texture.
Get your steam wand ready and position the tip just below the surface of the milk, slightly off-centre. As you turn it on, you should hear a gentle hissing, a bit like the sound of tearing paper. This is the stretching phase. It’s a short one—it should only last for a few seconds, just until the outside of the jug feels lukewarm to the touch.
Once you feel that warmth, it’s time to act. Submerge the wand a little deeper into the milk. Your goal now is to create a powerful vortex, or whirlpool, which gets the milk spinning rapidly. This is the part that breaks down any large bubbles into microscopic ones, creating that signature velvety microfoam. Keep this going until the jug is almost too hot to hold comfortably, which is right around 60-65°C.
This diagram nails the key details for getting that perfect microfoam every time.
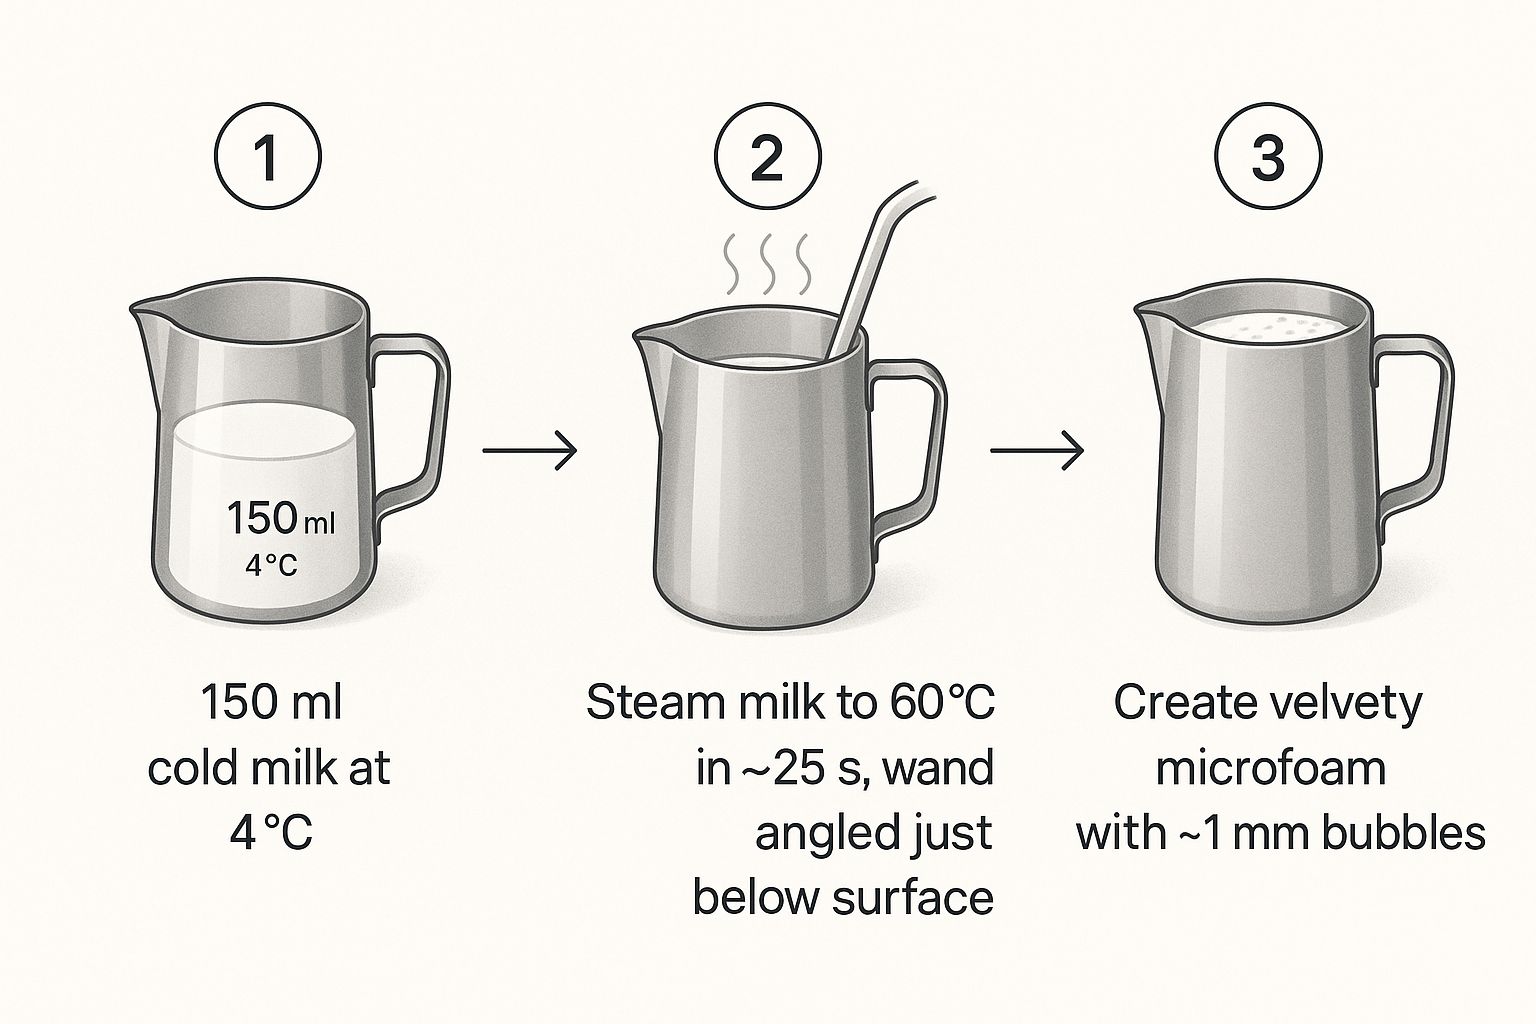
As you can see, hitting that temperature sweet spot and nailing your technique is what transforms cold milk into the silky microfoam a true flat white needs.
The perfect microfoam should look exactly like wet paint—glossy, smooth, and with no visible bubbles. If you do spot a few bubbles, don't panic. Just give the jug a firm tap on the counter and a gentle swirl to fold them back in before you pour.
Before you even think about pouring, wipe your steam wand immediately and give it a quick purge to clear out any milk. It's a small step, but it keeps your gear in top condition. Now, your beautifully steamed milk is ready to meet your freshly pulled espresso shot. This is where the artistry truly comes together.
Mastering the Art of the Pour

This is the final flourish, the moment that brings your perfectly extracted espresso and silky milk together into one harmonious drink. Getting this pour right is the culmination of your efforts, turning two great components into a single, cohesive flat white.
First thing’s first, give both your espresso and your milk a quick swirl. A gentle swirl in the cup keeps the crema even, while a swirl of the jug keeps that glossy microfoam from separating. It's a small step, but it makes a huge difference.
The Pouring Motion
Now, you’re ready to combine them. The secret is all about controlling the height and speed of your pour to get that signature velvety texture.
- Start High: Begin pouring from about 10cm above the cup, aiming for the centre of the espresso. This initial height lets the milk dive under the crema, mixing everything together without washing out that beautiful coffee base.
- Move Low: As the cup starts to fill, bring the spout of your milk jug right down close to the surface. This is the crucial move that allows the white microfoam to start floating on top, creating the pattern.
- Finish Strong: Keep pouring steadily until you see a white dot or a simple heart shape forming. That’s the classic look you’re aiming for.
Remember, taste is always king. While latte art is a satisfying skill to develop, your initial focus should be on creating a delicious, beautifully textured drink. The art will come naturally with practice.
With 80% of UK coffee drinkers visiting cafés at least weekly, the demand for consistently high-quality coffee is clear. This drive for excellence is also reflected at home, with UK consumers spending on average £16 monthly on coffee for their own kitchens—a real testament to the growing love for speciality experiences. You can read more about UK coffee consumption trends. Your perfect pour is your personal contribution to this amazing culture.
Your Questions Answered
As you get to grips with making a flat white at home, a few questions are bound to pop up. It happens to everyone. This little section is here to tackle the most common hurdles, helping you troubleshoot and fine-tune your technique.
What’s the Real Difference Between a Flat White and a Latte?
Honestly, it all comes down to texture and ratio. A flat white uses a much thinner layer of silky microfoam that’s fully integrated with the espresso, which gives you a stronger, more coffee-forward flavour.
A latte, on the other hand, has more milk and a thicker, more distinct layer of foam on top. This makes it a milder, creamier drink. Think of it this way: a flat white is all about celebrating the coffee, while a latte is a milkier, more mellow experience.
The real giveaway is the mouthfeel. A great flat white has a consistent, velvety texture from the first sip to the last. With a latte, you get more of a separation between the milky coffee and the foamy topping.
Can I Make a Good Flat White with Non-Dairy Milk?
Absolutely. The trick is to use a ‘barista edition’ of your favourite plant-based milk. Barista-style oat milk is probably the most popular choice in the UK right now, and for good reason—it steams beautifully without splitting and creates a silky texture that’s impressively close to dairy.
Standard plant milks just don't have the right protein and fat structure to hold a stable microfoam.
To get the best results:
- Always grab a barista version of your chosen milk alternative.
- Keep it nice and chilled in the fridge before you steam it. It makes a world of difference.
Why Is My Steamed Milk So Bubbly?
This is a common issue when starting out, and it usually means you’re letting too much air in at the start. You only need to ‘stretch’ the milk for a few seconds—just long enough for the outside of the jug to feel lukewarm. Any longer, and you'll end up with big, soapy bubbles instead of that glossy microfoam we're after.
Once you hit that lukewarm point, sink the steam wand a bit deeper. Your goal is to get the milk spinning into a smooth vortex. This whirlpool motion is what breaks down any larger bubbles and gives you that perfect, velvety finish.
What Size Cup Should I Use for a Flat White?
Traditionally, a flat white is served in a smaller ceramic cup, usually somewhere between 150ml and 180ml (5-6 oz).
This isn't just for looks. The size is carefully chosen to maintain that perfect coffee-to-milk ratio, making sure the espresso's flavour punches through instead of getting lost in a sea of milk. If you use a bigger cup, you'll dilute the drink and end up with something that's basically just a small latte.
Ready to put all this into practice? Ue Coffee Roasters offers a curated selection of speciality coffee beans, from rich blends to unique single origins, perfect for your next flat white. Explore our range and find the perfect brewing equipment to elevate your home coffee experience at https://www.uecoffeeroasters.com.