

Best Way to Brew Coffee at Home: Ultimate UK Guide
Discovering the best way to brew coffee at home isn't about finding some secret, one-size-fits-all method. It’s about discovering the ritual that feels right for you. It's the one that slips perfectly into your morning rhythm, lights up your taste buds, and turns a simple daily task into a moment of pure, mindful satisfaction. The perfect cup, you'll soon find, is always the one crafted by your own hands.
Your Journey to the Perfect Cup Starts Here
Welcome to the wonderful world of brewing coffee at home. Think of this guide as your companion, an invitation to step away from the café queue and transform your own kitchen into your favourite coffee spot. This is about so much more than saving a bit of cash; it's about the deep-seated satisfaction that comes from creating something that is perfectly, uniquely yours.
We're going to explore how finding your personal brewing style can turn a morning chore into a cherished experience—one you'll genuinely look forward to each day.
This whole journey really comes down to four key elements working together to create something special in your cup. Getting to know them is your first real step towards brewing mastery.
- The Beans: This is the heart and soul of your coffee. It's where every nuance of flavour is born.
- The Grind: This is how you unlock all that potential flavour, tailored precisely to your brewing method.
- The Water: The unsung hero. It makes up over 98% of what's in your mug, so it matters more than you think.
- The Method: The equipment and technique that pull everything together into a beautiful, cohesive brew.
It's Simpler Than You Think
We’ll peel back the layers on how these elements play off each other, giving you the confidence to start experimenting and finding what you genuinely love. For example, you’ll learn why a coarse grind is perfect for a French Press—it needs that longer steeping time to extract all the good stuff without turning bitter. On the flip side, you'll see why a super-fine grind is essential for espresso, creating the pressure needed to pull a rich, syrupy shot in seconds.
My goal here is to empower you. Once you understand the fundamentals, you earn the freedom to bend the rules, tweak the variables, and chase the exact flavours that make you happy.
This adventure is all about turning knowledge into practice. We'll show you how tiny adjustments—a few degrees difference in water temperature, a new bag of beans from a different origin, or trying a new brewer—can completely change the character of your coffee.
Let's get started. It's time to make your kitchen the best coffee destination in town.
Finding Your Perfect Brewing Method
This is where your personal coffee story truly begins. Choosing how you brew isn't just about picking up a new piece of kit; it's about finding a ritual that fits perfectly into your day. The best way to brew coffee at home is, quite simply, the one that resonates with your lifestyle, your taste, and how much time you want to spend making it.
Let's dive into the unique personalities of the most popular home brewing methods. We'll go beyond basic instructions to get to the heart of why you might choose one over the other, helping you find your perfect match.
The Bold and Immersive French Press
The French Press is a classic for a very good reason. It’s an immersion brewer, which means the coffee grounds and water steep together, a bit like making a pot of tea. This full-contact method draws out a huge amount of oils and fine particles that a paper filter would normally catch.
What do you get? A full-bodied, rich, and often bold cup with a wonderfully heavy mouthfeel. It's the ideal companion for a lazy Sunday morning when you have time to savour the process and the deep, complex flavours it creates. If you love a coffee that has some real weight and texture, the French Press is calling your name.
A word of warning, though: this method does require a little finesse to avoid a "muddy" or silty cup at the bottom. Getting a consistent, coarse grind is absolutely essential to stop the brew from turning bitter.
The Clean and Nuanced Pour-Over
In almost direct contrast to the French press, the pour-over is all about achieving clarity and having total control. This method involves you manually pouring hot water over coffee grounds nestled in a paper filter. Think of it as a delicate dance between you, the water, and the coffee.
Because the water passes through the grounds and the filter, it creates an exceptionally clean, bright, and nuanced cup. This is where the delicate floral and fruity notes of single-origin beans truly get to shine.
The pour-over is for the coffee lover who enjoys the ritual itself. It asks for your full attention—from the specific spiral pouring pattern to the precise timing of each stage. If you see brewing as a mindful practice and want to taste every last subtle note in your beans, this is the one for you.
To help you figure out where to start, this visual guide offers a simple path based on what you prioritise in your coffee.
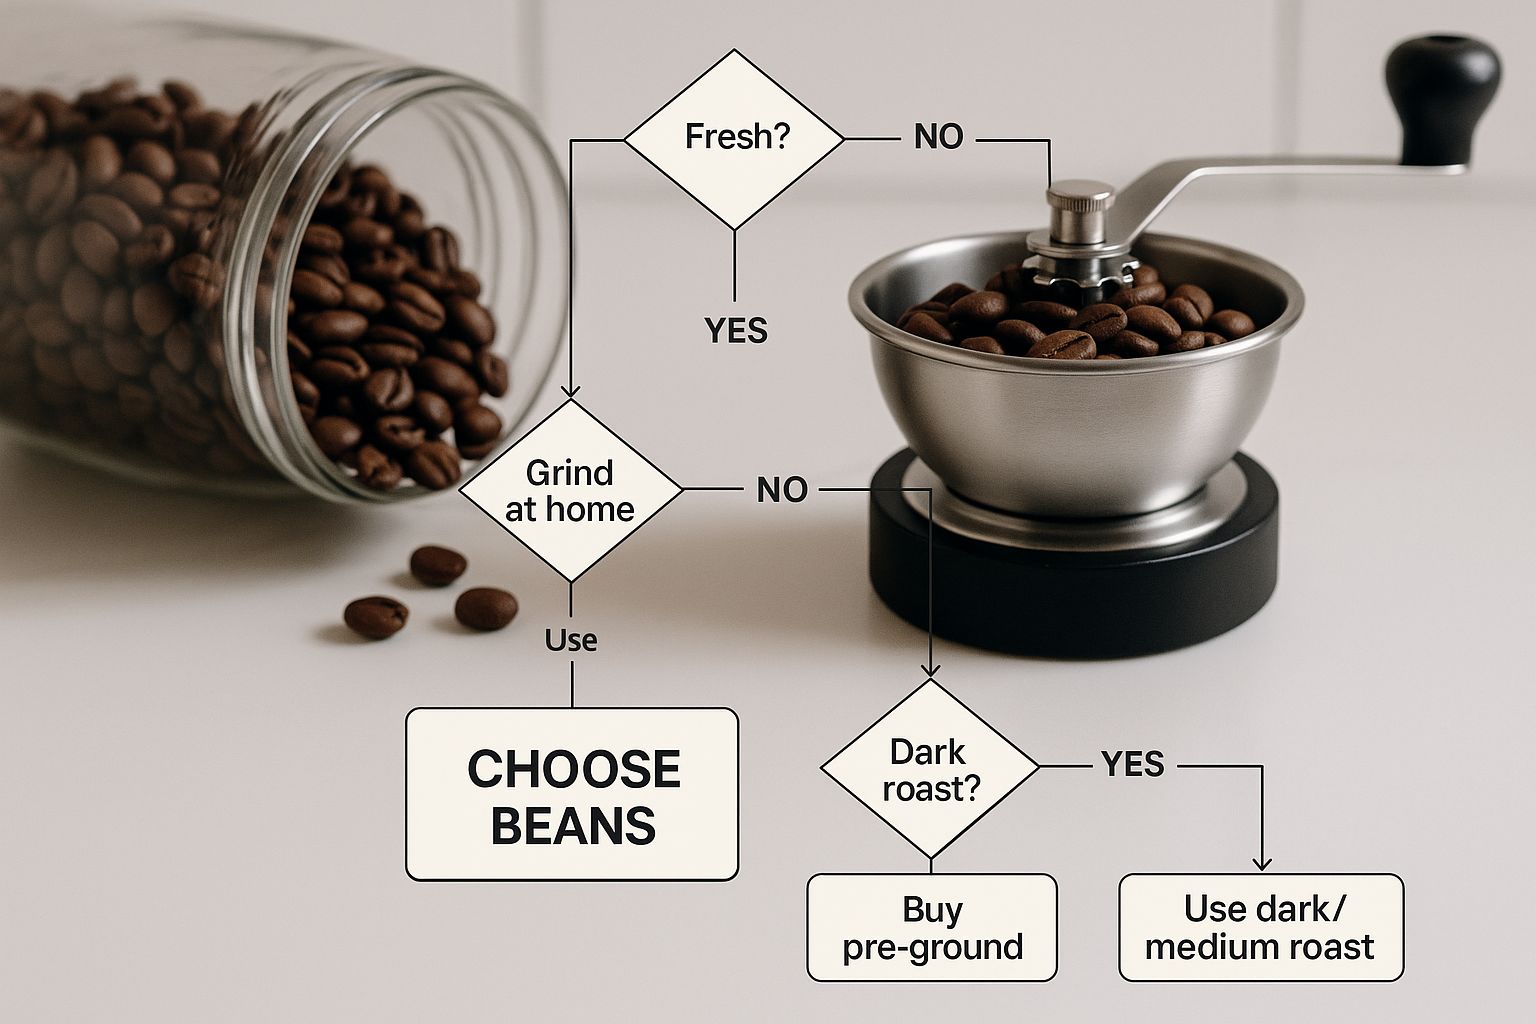
As you can see, no matter which method you lean towards, the journey to a brilliant cup always starts with the beans themselves.
The Swift and Versatile AeroPress
The AeroPress is the ingenious multi-tool of the coffee world. It's a modern invention that brilliantly combines immersion with pressure to brew a fantastic cup in about a minute. Its incredible speed and durability make it the ultimate choice for busy professionals, keen travellers, or anyone who wants consistently great coffee without any of the usual fuss.
Its real magic is in its versatility. You can whip up a short, concentrated espresso-style shot or add more water for a longer, Americano-style drink. The paper micro-filter guarantees a really clean cup, completely free from grit, but the pressure extraction gives it a richness that your standard drip coffee often lacks.
The AeroPress is proof that speed doesn't have to mean sacrificing quality. It's a testament to clever design, delivering a remarkably smooth and flavourful brew with minimal cleanup.
The Timeless and Potent Moka Pot
Brewing with a Moka Pot feels like stepping right into a classic Italian kitchen. This iconic stovetop brewer uses steam pressure to push water up through the coffee grounds, creating a strong, concentrated coffee with an intense aroma.
While it’s not technically espresso, it’s about the closest you can get without investing in a pricey machine. The brew it produces is rich, potent, and has a syrupy body that stands up beautifully to milk in a latte or cappuccino. The Moka Pot is for those who crave a powerful, traditional coffee experience and appreciate the timeless design of a true classic.
This brewing method is becoming deeply ingrained in the UK's coffee culture, where an appreciation for quality home brewing is on the rise. With Britons drinking around 98 million cups every day, there's a definite shift happening. While 80% of UK households still buy instant coffee, younger generations are increasingly turning to ground coffee and pods for a fresher, more personal experience. This trend points to a growing desire for methods like the Moka Pot and Pour-Over, as people spending about £16 monthly on coffee at home look to elevate their daily cup. You can read more about the UK's coffee consumption habits on balancecoffee.co.uk.
Which Home Brewing Method Fits Your Life?
So, how do you decide? Let's put these methods side-by-side. Think about what you truly value in your daily routine. Is it speed, the ritual, a specific flavour, or just sheer simplicity? This table should help you find your perfect match.
| Brewing Method | Flavour Profile | Effort & Time | Ideal For |
|---|---|---|---|
| French Press | Bold, full-bodied, rich, heavy mouthfeel. | Low effort, 4-5 minutes brew time. | The weekend enthusiast who loves a textured, robust cup. |
| Pour-Over | Clean, bright, nuanced, highlighting delicate notes. | High effort, requires focus and technique, 3-4 minutes brew time. | The mindful brewer who enjoys the ritual and wants flavour clarity. |
| AeroPress | Smooth, rich, versatile, very clean finish. | Low effort, 1-2 minutes brew time. | The busy professional or traveller needing a fast, consistent, great cup. |
| Moka Pot | Strong, intense, syrupy, espresso-like. | Medium effort, requires stovetop monitoring, 5-7 minutes brew time. | The traditionalist who craves a potent, rich brew for lattes or on its own. |
Ultimately, finding the best way to brew coffee at home is a personal journey of discovery. Your choice isn't set in stone; many coffee lovers I know own two or three different brewers, choosing one based on their mood, the time they have, or the specific beans they're excited about. Start with the method that speaks to you most, and just let your curiosity guide you from there.
The Hidden Secrets: Beans, Grind, and Water
While your brewer sets the stage, the real performance comes from three fundamental elements: the coffee beans, the consistency of your grind, and the quality of your water. Honestly, this is where you graduate from simply making coffee to truly crafting it. Mastering these three things is how you’ll unlock flavours you never knew existed.
It all starts with the heart of the matter—the beans themselves. This is where every journey to a remarkable cup begins.
How to Read a Coffee Bag Like a Pro
Walking into a speciality coffee shop or browsing online can feel a bit much at first. You’re met with bags adorned with flavour notes like "stone fruit" or "baker's chocolate" and terms like "single origin" or "blend." It’s actually simpler than it looks.
A single-origin coffee comes from one specific farm, producer, or region. Think of it like a fine wine from a single vineyard. These coffees are celebrated for their unique and often vibrant flavour profiles, reflecting the specific soil, climate, and processing methods of their birthplace. An Ethiopian Yirgacheffe, for instance, is famous for its bright, floral, and almost tea-like qualities.
A blend, on the other hand, is a thoughtful combination of beans from different origins. Roasters create blends to achieve a specific, consistent flavour that’s often more balanced and rounded. Our very own Ue Coffee Roasters house blend, for example, is crafted for a smooth, rich, and dependable cup that tastes fantastic day after day.
- Choose Single Origin for: An adventure in flavour. If you want to explore the distinct tastes of different coffee-growing regions, this is your ticket.
- Choose a Blend for: Consistency and balance. If you've found a flavour profile you love—perhaps something chocolatey and nutty—a blend will deliver that reliably.
This growing appreciation for quality beans is reshaping coffee habits right across the UK. The national coffee industry contributes a massive £9.1 billion in Gross Value-Added to the economy, a testament to its cultural and financial importance. While instant coffee is still found in about 80% of households, a clear trend towards premium experiences is emerging, especially as the roasted coffee segment shows the fastest growth. This desire for higher quality is precisely what drives people to explore brewing with fresh beans. You can discover more insights from the British Coffee Association on the UK's flourishing coffee scene.
The Single Most Important Upgrade You Can Make
If there is one piece of equipment that will fundamentally change your coffee game, it's not a fancy brewer or an expensive machine. It is a quality burr grinder.
Those little appliances with a spinning blade? They’re blade grinders, and they just chop beans into inconsistent pieces. This mix of fine dust and large chunks leads to uneven extraction—the small bits become bitter while the large ones remain sour and weak.
A burr grinder, however, uses two revolving abrasive surfaces (burrs) to crush beans into a uniform size. This consistency is the secret to a balanced, flavourful, and repeatable brew. It is, without exaggeration, the key that unlocks the true potential hidden inside your beans.
Your coffee is only ever as good as your grind. Investing in a good burr grinder is an investment in every single cup of coffee you’ll make from that day forward.
Matching Your Grind to Your Brewer
The ideal grind size is entirely dependent on your chosen brewing method. It all comes down to the amount of time the water is in contact with the coffee grounds.
- Coarse Grind (like coarse sea salt): Perfect for methods with long steeping times, like a French Press. The large particles prevent over-extraction, keeping bitterness at bay.
- Medium Grind (like granulated sugar): The sweet spot for most automatic drip coffee makers and some pour-overs like the Chemex.
- Medium-Fine Grind (slightly finer than sugar): Ideal for most cone-shaped pour-over brewers (like a V60) and the AeroPress. This provides enough surface area for a quick, efficient extraction.
- Fine Grind (like table salt): Required for Moka Pots and espresso machines, where water is forced through the coffee under pressure in a very short amount of time.
Experimenting here is crucial. If your coffee tastes bitter, try a slightly coarser grind next time. If it’s weak and sour, grind a little finer. This simple adjustment gives you incredible control over the final taste in your cup.
The Unsung Hero: Water
Coffee is over 98% water, yet it's the element we most often overlook. Using water straight from the tap can introduce unwanted minerals and chlorine, which can mask the delicate flavours of your beautiful coffee.
You don't need to buy expensive bottled water. A simple, affordable carbon filter jug will do wonders. By filtering your tap water, you remove the impurities that interfere with flavour, allowing the coffee's natural sweetness and complexity to shine through.
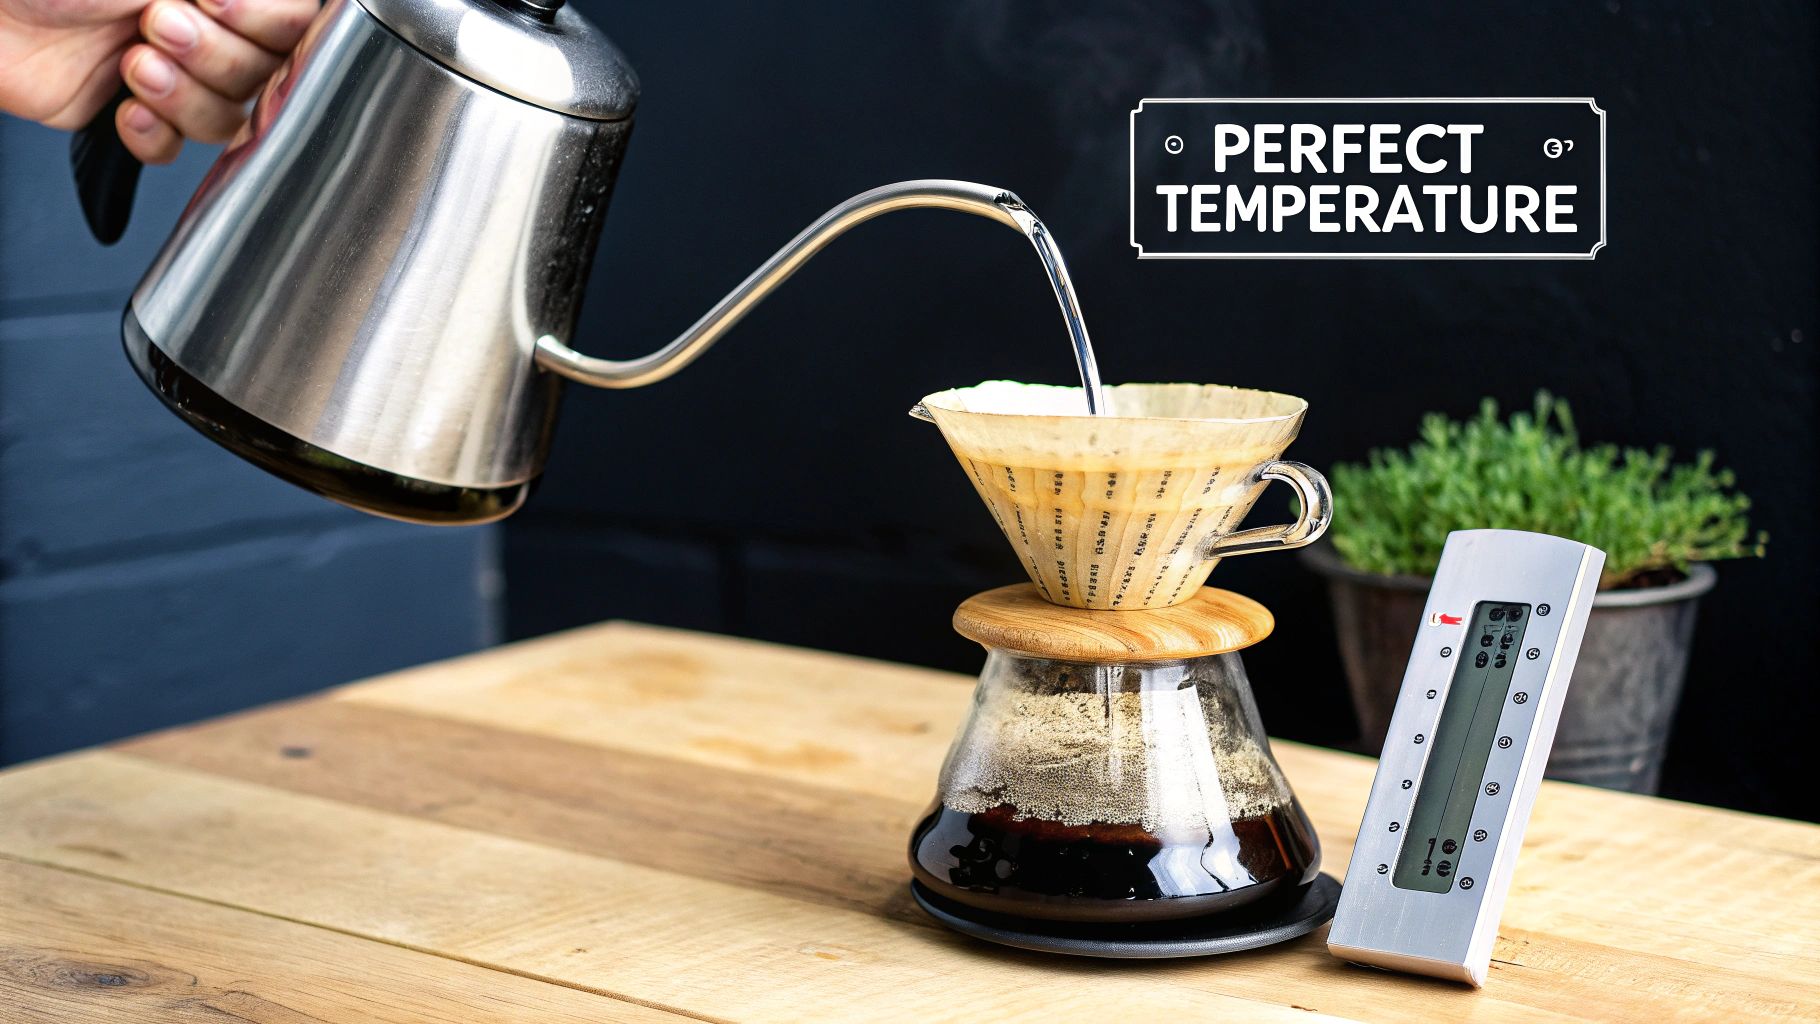
Beyond purity, temperature is the other critical variable. The ideal brewing temperature is between 90-96°C (195-205°F).
- Too Hot: Water at a rolling boil (100°C) will scorch the coffee grounds, resulting in a harsh, bitter taste.
- Too Cool: Water below 90°C won't have enough energy to extract all the desirable flavour compounds, leading to a flat, weak, and under-extracted brew.
The easiest way to hit this target? Boil your kettle, then just let it sit for about 30 to 60 seconds before you start pouring. This simple pause is often the final secret ingredient that turns a good cup of coffee into an exceptional one.
Mastering the Art of the Pour-Over Brew
Alright, this is where the theory gets real, and we get our hands dirty. We're going to dive into one of the most satisfying brewing methods out there: the pour-over. This isn't just about mechanically following a recipe. It's about feeling the process, using your senses, and discovering the rhythm that transforms simple coffee and water into a truly spectacular cup.
Coffee aficionados adore the pour-over because it gives you ultimate control over every single variable. This is your secret weapon for teasing out all those delicate, nuanced flavours hiding inside your beans. Think of it as a creative workshop in your kitchen, with you as the artisan.
Preparing Your Stage
First things first, let's get our station ready. It’s the little details here that elevate a brew from good to unforgettable. Our mission is to eliminate anything that could get in the way of the pure, unadulterated taste of the coffee.
Pop your paper filter into the dripper. Now, for the most important first step: rinse the filter thoroughly with hot water. This isn't optional! It achieves two critical things: it washes away any lingering papery taste and it preheats your dripper and server, which is crucial for keeping your coffee hot. Don't be timid with the water – give it a proper soak.
Once it's rinsed, remember to discard that water from your server. Now, for the star of the show. For a single, beautiful cup, 20 grams of medium-fine ground coffee is a fantastic starting point. Place your entire setup—server, dripper, and filter—onto a digital scale and hit 'tare' to zero it out before you add your grounds. Getting this right is the bedrock of a consistently delicious brew.
The Art of the Bloom
This is where the magic really begins to unfold. With your ground coffee nestled in the filter, tare the scale to zero again. Now, start your timer and begin pouring just enough hot water to evenly saturate all the grounds. You're aiming for about twice the weight of your coffee, so for our 20 grams of coffee, that’s 40 grams of water.
Then, just pause. Watch. You’ll see the coffee bed swell and bubble up, releasing trapped CO₂. This is the bloom, and it’s a beautiful, vital part of the process. Freshly roasted coffee will bloom with dramatic life, a sure sign of its quality. Let it sit and de-gas for about 30–45 seconds. This simple pause stops sour notes from creeping into your cup and primes the grounds for a perfect extraction.
The bloom is the coffee's first breath. It’s a moment of transformation where aroma fills the air, and you know something special is about to happen. Taking a moment to appreciate this is part of the joy of the pour-over.
The Rhythmic Pouring Phase
Once the bloom has settled down, it’s time for the main event. The goal now is to add the rest of your water to hit your target ratio. A brilliant place to start is the classic 1:16 ratio. For our 20 grams of coffee, that means a total of 320 grams of water. Since we've already used 40g for the bloom, we have 280g left to pour.
Pour the remaining water slowly and with purpose. Use a gentle, spiralling motion, starting in the centre, moving outwards, and then circling back in. Try your best to avoid pouring directly down the sides of the filter paper. This technique ensures all the coffee grounds are working for you, preventing 'channels' where water might sneak through without extracting that precious flavour.
You can do this in a few separate pours, letting the water level drop a bit in between, or as one long, continuous pour. Experiment and see what you prefer! Your total brew time should fall somewhere between 2 minutes 30 seconds and 3 minutes 30 seconds.
- If your brew finishes too quickly: The coffee might taste weak, watery, or sour. Your grind is likely too coarse. Try grinding a little finer next time.
- If your brew takes too long: You might notice a bitter, heavy taste. Your grind is probably too fine. Loosen it up with a coarser setting.
Once all the water has passed through the coffee bed, remove the dripper. Give your server a gentle swirl to integrate all the layers of flavour, and pour it into your favourite mug. Before you take a sip, just breathe in the incredible aroma you’ve unlocked. You didn’t just make coffee; you crafted a unique expression of that bean. That, right there, is the true art of brewing.
Troubleshooting Your Brew and Tasting Like a Pro
So, you’ve followed all the steps, brewed your first cup, and now it’s the moment of truth. What if it doesn’t taste quite right? Don't worry. This isn't a failure; it’s where your real education in coffee truly begins. Learning to diagnose your brew is the skill that separates a good home brewer from a great one, empowering you to perfect your craft with every single cup.
Think of yourself as a coffee detective. Every taste, whether it’s spot-on or slightly off, offers clues. Let’s get to the bottom of the most common issues you're likely to face, turning a bit of frustration into a seriously rewarding challenge.
Solving Common Brewing Problems
That first sip tells a story. If it’s not a happy one, it's almost always a tale of either over-extraction or under-extraction. Getting your head around these two concepts is your key to unlocking consistently brilliant coffee.
- "My coffee tastes bitter and harsh." This is the classic sign of over-extraction. It simply means the water spent too much time with the coffee grounds, pulling out too many of the unpleasant, bitter-tasting compounds. It’s an easy fix! Try a slightly coarser grind on your next go, or simply shorten your brew time.
- "My coffee tastes sour and weak." And here we have its opposite: under-extraction. The water didn’t have enough time or heat to pull out all the sweet, desirable flavours, leaving you with a thin, acidic cup. The solution is straightforward: use a finer grind to increase the surface area the water can interact with, or just make sure your water is hot enough (aim for that 90-96°C sweet spot).
Think of extraction as a spectrum. Your goal is to land right in that delicious sweet spot in the middle. The secret is to make one small adjustment at a time—don't change the grind size and the brew time at once—so you can clearly see how each change affects the final taste.
Your palate is your most powerful tool. Trust it. The moment you can name what’s wrong—‘bitter’ or ‘sour’—you're already halfway to fixing it. This is the diagnostic skill that will help you find the best way to brew coffee at home for your specific setup.
This cycle of brewing, tasting, and tweaking is a familiar ritual for coffee drinkers across the UK. With 30% of UK consumers drinking coffee multiple times a day, the desire for a reliable home method is huge. While many of us love a good café, a significant 37% report never buying from them, highlighting a strong and growing culture of home brewing. This dedication makes understanding troubleshooting essential for daily satisfaction. You can dive deeper into the data by exploring the UK’s coffee consumption patterns on statista.com.
Learning to Taste Like a Pro
Once you’re consistently brewing a balanced cup, the next thrilling step is learning to appreciate its finer qualities. Tasting coffee isn't about being pretentious; it's simply about paying attention and discovering what you truly enjoy. It’s a sensory journey that makes every single cup more meaningful.
To start, just focus on these four core components. They're the building blocks of flavour in every coffee you'll ever drink.
| Tasting Component | What to Look For | Real-World Example |
|---|---|---|
| Acidity | A bright, sparkling, or tangy sensation—not to be confused with sourness. | Think of the clean snap of a green apple or the zesty pop of a fresh orange. |
| Sweetness | The pleasant, mellow flavours that give the coffee its roundness and depth. | This can taste like rich caramel, golden honey, or the gentle sweetness of milk chocolate. |
| Body (or Mouthfeel) | The physical weight and texture of the coffee in your mouth. | Compare the light, tea-like feeling of a filter coffee to the rich, heavy creaminess of a French Press. |
| Finish | The lingering taste and sensation left on your palate after you swallow. | Does a pleasant chocolatey note remain, or does it leave a dry, astringent feeling? |
Start a Simple Coffee Journal
Honestly, the best way to develop your palate is to just keep track of what you're drinking. You don't need a fancy Moleskine notebook; the notes app on your phone is perfect. For each new coffee you try, just jot down a few simple thoughts.
- Coffee: Which beans did you use? (e.g., Ue Coffee Roasters House Blend)
- Method: How did you brew it? (e.g., Pour-over, 20g coffee to 320g water)
- Tasting Notes: What did you notice? (e.g., "Really smooth, lots of chocolate. A bit bitter at the end—maybe I'll grind it a touch coarser next time?")
This simple habit will quickly reveal patterns in what you love. You’ll start connecting specific beans, roast levels, or brewing methods to the flavours that bring you the most joy. This is how making coffee transforms from a routine into a deeply personal and rewarding craft.
Answering Your Home Brewing Questions
As you get more adventurous with your coffee, you’ll naturally start asking more questions. That’s a fantastic sign! It means you’re really digging in and getting curious. Think of this section as a chat with a seasoned barista, ready to clear up those common "what if" and "how-to" moments that pop up.
Getting these fundamentals right is what gives you the confidence to start experimenting, tweaking your methods, and finding what makes an amazing cup of coffee for you.
How Should I Store My Coffee Beans?
The best way to protect your beans is to keep them in an airtight, opaque container at room temperature. The big three enemies of fresh coffee are oxygen, light, and moisture. That’s precisely why the fridge and freezer are no-go zones – the condensation wreaks havoc on the delicate oils that carry all that beautiful flavour.
Honestly, the best approach is to buy smaller bags more often. Try to get through your beans within two to three weeks of the roast date. That’s when they’re at their most vibrant and expressive.
Think of coffee beans like you would fresh bread, not tinned soup. Their character shines brightest right after they're made. A little care goes a long way in preserving the roaster's craft and making sure you get to enjoy it.
Do I Really Need a Coffee Scale?
I get it, it can seem a bit obsessive. But trust me, a digital scale is the single biggest game-changer for brewing consistently delicious coffee. Using a scoop is a total shot in the dark; bean size and density can vary so much from one coffee to the next, meaning your "one scoop" is never really the same.
A scale lets you lock in your coffee-to-water ratio every single time. It’s what allows you to have that one mind-blowingly perfect cup and then, crucially, be able to make it again tomorrow. It takes all the guesswork out of the equation and puts you firmly in control.
What’s the Best Water Temperature for Brewing?
For that perfect extraction, you want your water to be just off the boil. The sweet spot is a window between 90°C and 96°C (195-205°F).
If your water is at a full, roaring boil (100°C), it’s simply too hot. It will scorch the coffee grounds, leaving you with a harsh, bitter brew. On the flip side, water that’s too cool just doesn’t have the energy to pull out all the sweet, complex flavours, resulting in a weak and often sour cup.
Here’s an easy trick: once your kettle clicks off, just let it sit for 30 to 60 seconds before you pour. That little pause is usually all you need to bring the temperature down into that ideal range.
How Often Should I Clean My Brewing Gear?
The short answer? After every single use. I know it sounds like a chore, but old coffee oils and fine particles build up shockingly fast. These leftovers quickly go rancid and will taint your next brew with a stale, bitter taste, ruining all your hard work.
For daily cleaning, a quick, thorough rinse with hot water is all you need. Then, every couple of weeks, it's a good idea to do a deep clean with a dedicated coffee equipment cleaner. This will break down any stubborn oils and keep your gear in top-notch condition for years to come.
Ready to turn all this knowledge into a truly exceptional cup? At Ue Coffee Roasters, we source and roast incredible coffees designed to elevate your home brewing experience. Come and explore our single origins, signature blends, and brewing equipment. Discover your next favourite coffee at uecoffeeroasters.com.