

Descaling coffee machine: The Ultimate Office Brew Guide
That first sip of a perfectly brewed coffee can make or break a morning in the office. It's a small but essential perk that keeps the team fuelled and focused. But behind the scenes, a silent saboteur is always at work: limescale. Descaling a coffee machine is the single most important bit of maintenance you can do to fight it off, ensuring every cup comes out hot, flavourful, and just right.
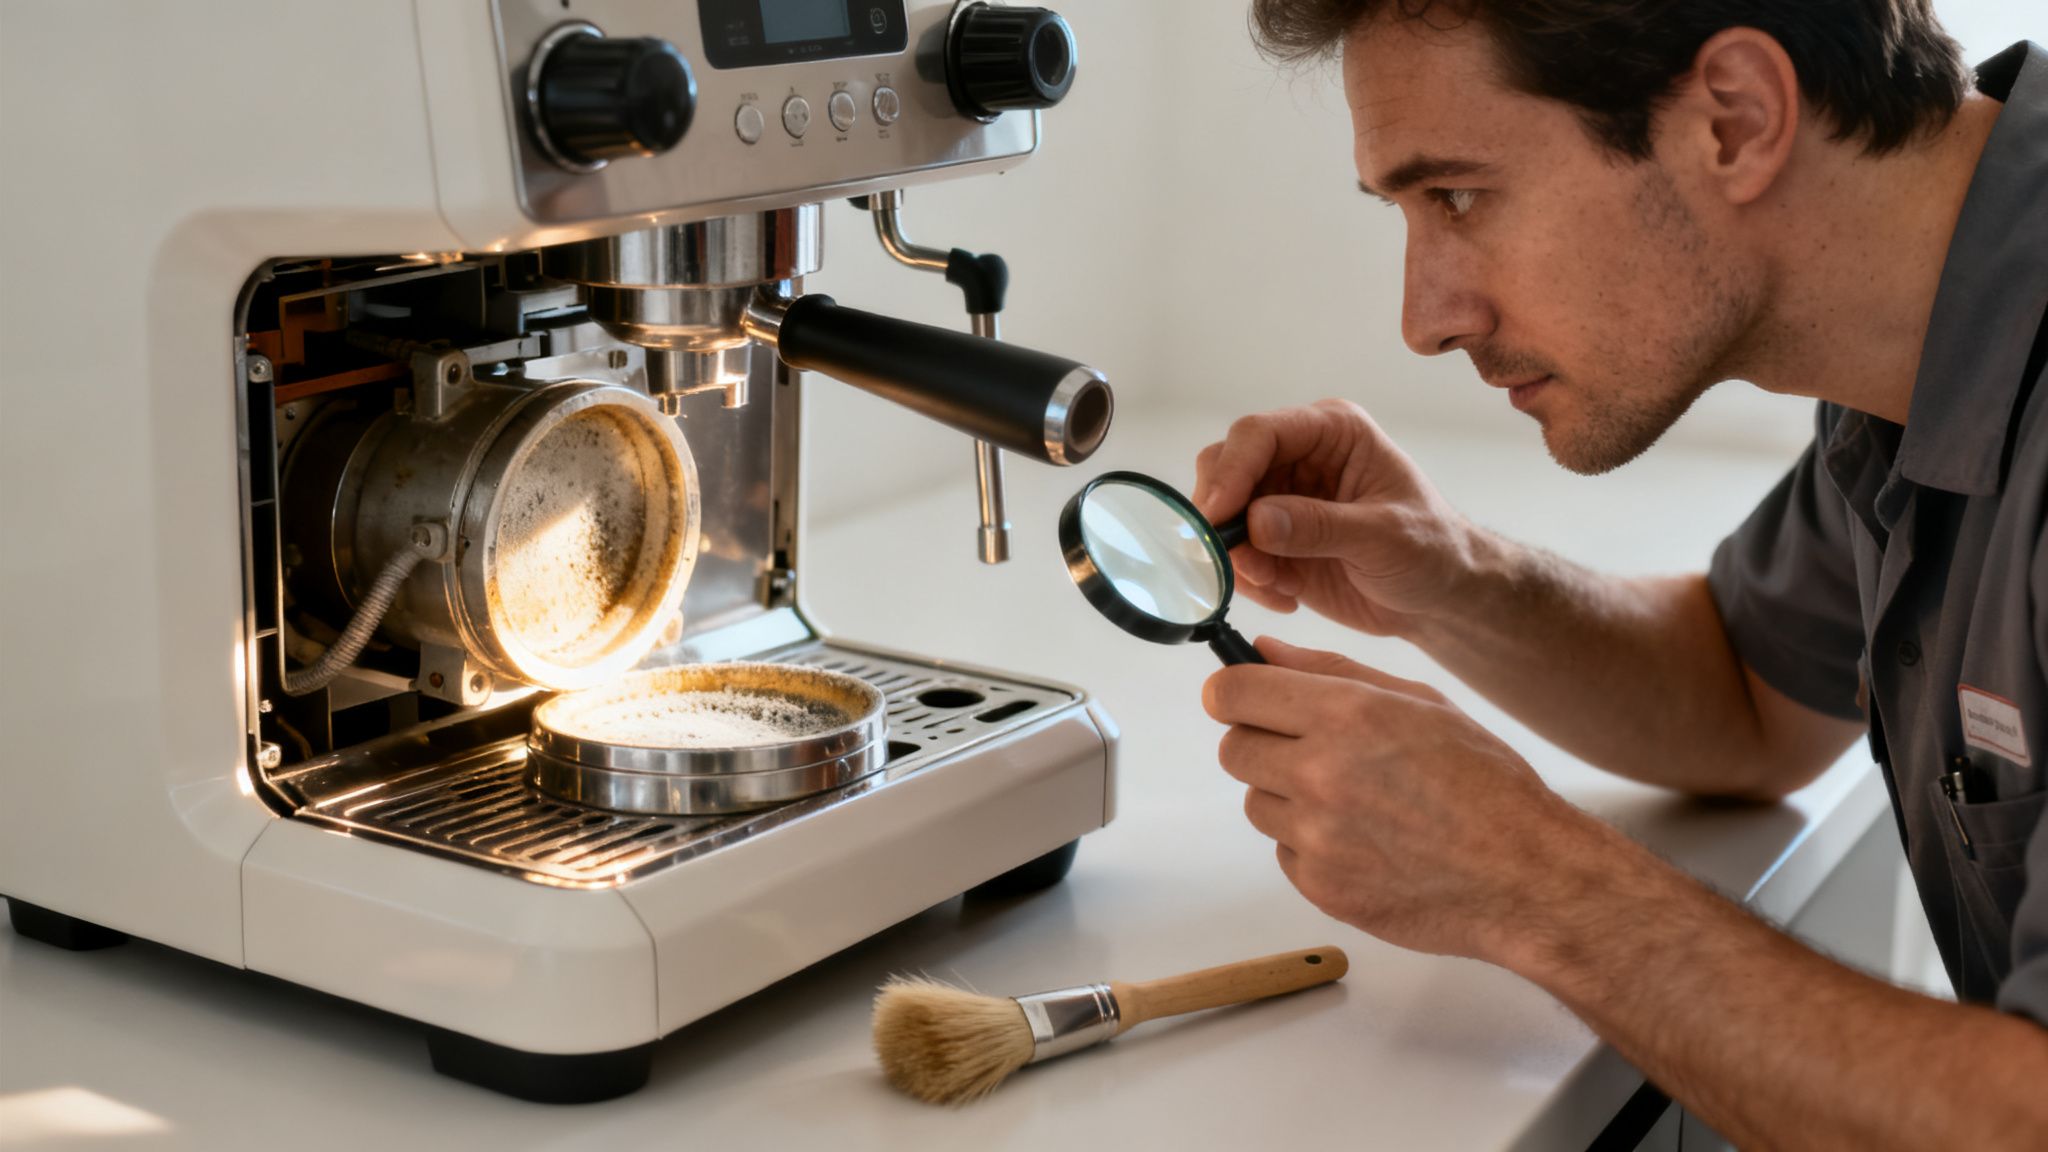
The Hidden Enemy of Your Office Coffee Machine
Think of your high-performance office coffee machine as a finely tuned instrument. Every part, from the heating element deep inside to the maze of internal pipes, is engineered to work together flawlessly. But every time you brew a coffee, a hidden threat is quietly building up—mineral deposits.
This build-up, which we all know as limescale, is the unavoidable result of heating water that contains minerals like calcium and magnesium. It’s far more than a minor nuisance; it's a direct threat to your machine’s health, its efficiency, and the quality of the coffee it produces.
Why Hard Water Is The Real Culprit
How quickly limescale takes hold comes down to your water source. Here in the UK, it’s a major issue, with over 60% of households dealing with hard water thanks to our geology. In places like London and the Midlands, the water is so hard that limescale can build up 50% faster than in soft water areas.
Limescale is a problem because it acts like an insulator. It coats the heating elements, forcing your machine to work much harder and use more electricity just to get the water to the right temperature. This constant strain not only shortens the machine's lifespan but also causes a few problems you’ll definitely notice:
- Lukewarm Coffee: There’s nothing worse than a tepid flat white. Limescale physically stops the machine from heating water properly.
- Bitter or "Off" Flavours: Those mineral deposits can flake off and end up in your drink, leaving a chalky or metallic taste that ruins the delicate notes of your coffee beans.
- Reduced Water Flow: As limescale clogs the internal pipework, your machine will start to struggle. You'll notice it takes longer to pour a coffee, and the cup volumes might get smaller.
- Increased Risk of Breakdowns: Over time, the pressure from these blockages can lead to serious, expensive malfunctions. This isn't just about a broken machine; it's about significant downtime for your office's favourite perk. It’s not just coffee machines, either; you can see the effects of mineral deposits on appliances like water heaters, too.
Getting into a regular descaling routine isn’t just about cleaning—it’s about protecting your investment. It is the most effective thing you can do to make sure your machine consistently delivers the premium, barista-quality coffee your team deserves.
When you understand this hidden enemy, descaling a coffee machine stops feeling like a chore. It becomes a smart, proactive step to protect your equipment, elevate the office coffee experience, and ensure every single cup is as delicious as it should be.
A Practical Walkthrough to Descaling Your Machine
Let's be honest, the thought of descaling a coffee machine can feel a bit daunting, like a technical job best left to an engineer. But it's actually a surprisingly simple process that anyone can master. This guide is here to cut through the jargon and give you the confidence to look after your machine like a pro, making sure every single coffee is as good as the last.
We'll break it all down into easy, manageable stages: getting ready, running the descale cycle itself, and finishing up with the all-important rinse.
This simple diagram shows how minerals in your water slowly build up into limescale, which can cause some serious damage to the inside of your machine if left unchecked.

As you can see, ignoring this natural buildup turns a quick maintenance job into a potentially expensive repair.
Preparing for a Successful Descale
Before you even think about opening the descaling solution, a little bit of prep work makes all the difference. The goal is to get everything organised so the whole process is smooth and stress-free, with no last-minute panic.
First, have a quick look at your machine’s manual or check the display for any specific instructions. High-end office machines are incredibly smart and will often walk you through the process with on-screen prompts. Trusting the machine is always the best first step.
Next, get your kit together:
- Professional Descaling Solution: Always stick to a solution made specifically for high-performance coffee machines. Household products like vinegar contain acids that are just too harsh and can damage the sensitive seals and internal parts over time.
- A Large Container: You’ll need something to catch the water as it runs through the machine. A big measuring jug or even a clean bucket will do the trick.
- Clean Cloths: A couple of damp and dry microfibre cloths are great for wiping down surfaces and handling components.
With your supplies ready, it’s time to prep the machine itself. Take out the water tank, give it a good rinse, and empty any old water. Make sure to detach any milk frothers or carafes, too. The descaling cycle is all about cleaning the internal water pathways, nothing else.
The single most overlooked step? Simply reading the instructions on the descaling product. Different solutions have different concentrations and might need a specific water-to-solution ratio. Getting this right is absolutely crucial for a safe and effective clean.
Initiating and Running the Cycle
Right, with your machine and workspace prepped, it's time to get started. Pour the correct amount of descaling solution into the empty water tank, then top it up with fresh, cold water exactly as the product instructions tell you to.
Once the tank is back in place, go to your machine’s menu and find the "descale" or "maintenance" program. When you select it, the automated process will kick off. Don't worry, the machine knows exactly what to do. It will heat the solution and start pumping it through all the internal pipes and heating elements where limescale loves to hide.
You'll hear the pump whirring on and off – this is completely normal. The pauses are deliberate, giving the acidic solution time to get to work dissolving those stubborn mineral deposits. Think of it like soaking a dirty pan; the solution needs that contact time to properly break down the gunk.
This whole process can take anywhere from 20 to 45 minutes. During this time, the machine will gradually dispense the used solution into your container. It’s a good idea to keep half an eye on it to make sure it doesn't overflow.
The Critical Rinsing Phase
Once the machine signals that the descaling part is done, you've hit the most important stage of all: rinsing. This step is non-negotiable, both for the taste of your coffee and the health of your team.
A thorough rinse is essential to flush out any leftover descaling solution. If you skip this or rush it, you'll end up with a nasty chemical taste in your coffee and, more seriously, unwanted stuff in the drinks. The aim is to get the machine's internal system back to a perfectly clean state, with only pure water inside.
Here’s how to nail the rinse:
- Discard and Clean: Tip out the contents of the container that caught the descaling solution and give it a quick rinse.
- Rinse the Water Tank: Take the water tank out again and wash it thoroughly with warm water to get rid of any lingering solution.
- Fill with Fresh Water: Fill the tank right up to the maximum line with fresh, cold water and pop it back in the machine.
- Run the Rinse Cycle: The machine will now prompt you to start the rinse. It will pull all that fresh water through the entire system, just like it did with the descaler.
So many people make the mistake of only running one rinse cycle. For the best, most reliable results, I always recommend running at least two full tanks of fresh water through the machine. This extra diligence guarantees every last trace of the cleaning agent is gone.
After that final rinse, your machine isn't just clean—it's reset, refreshed, and ready to brew fantastic coffee again.
Developing a Proactive Machine Care Routine
Great coffee is never an accident. It’s the direct result of thoughtful, consistent care. Waiting for a warning light to flash is a reactive approach; a proactive maintenance routine, on the other hand, turns descaling your coffee machine from a chore into a strategic advantage. This ensures your machine runs at its best, protects your investment, and delivers the quality coffee your team deserves.
The heart of any good plan is a custom descaling schedule. There's no one-size-fits-all answer here—it has to be tailored to your office. The two biggest factors are your local water hardness and how many cups the machine makes daily. An office in a hard water area brewing 100+ cups a day might need descaling every few weeks, while a smaller team in a soft water zone could go much longer.

Choosing The Right Descaling Solution
When you're dealing with high-value office machines, not all descalers are created equal. You’ll often hear about DIY solutions like vinegar for home use, but they are completely unsuitable for professional equipment. The acetic acid in vinegar is aggressive and can slowly eat away at sensitive internal parts like rubber seals and metal O-rings, setting you up for expensive repairs down the line.
Instead, always reach for a professional-grade descaling solution. These products are specifically formulated with acids like citric or lactic acid, which are tough on stubborn limescale but gentle on the machine's delicate internals. They’re designed to work in harmony with your equipment, guaranteeing a thorough yet safe clean every single time.
Think of it like this: you wouldn't put the wrong type of fuel in a high-performance car. Using a professional descaler is the equivalent of using premium fuel for your coffee machine—it's essential for its longevity and performance.
Your Post-Descaling Performance Checklist
Once the descaling cycle is finished, a quick performance check is vital to confirm everything is working as it should. This is more than just turning off a warning light; it’s about verifying the health of your machine and the quality of your coffee.
Run through this simple checklist after every descale:
- Check the Water Flow: Brew a large black coffee or just dispense hot water. The stream should be strong, steady, and consistent—a clear sign that any internal blockages are gone.
- Do a Taste Test: The first coffee after a descale should taste the purest. Brew an espresso. It should be free of any chemical aftertaste or sour notes, which tells you the rinse cycle did its job properly.
- Look for Leaks: Give the area around the machine a quick once-over, especially near the drip tray and water connections. Make sure there are no drips or pools of water, which could point to a loose connection or a compromised seal.
- Listen for Normal Sounds: You know what your machine usually sounds like. Listen for any unusual hissing, clunking, or straining noises during the brew cycle that weren't there before.
This quick five-minute check provides peace of mind and helps you catch small issues before they snowball into major problems. It puts you in control of your machine's health.
Creating A Simple Maintenance Log
In a busy office, keeping track of maintenance can easily fall through the cracks. A simple, visible log or schedule can make a world of difference. It doesn’t need to be fancy; a basic chart stuck to a nearby cupboard or a shared digital document works perfectly.
Beyond daily cleaning, a truly proactive routine means understanding the maintenance needs of all your office appliances. For a wider view on equipment management, you might find an ultimate commercial kitchen equipment checklist helpful.
Here’s a straightforward template to get you started.
Office Coffee Machine Maintenance Schedule Template
A simple log like this helps any office manager stay on top of maintenance, turning what feels like a complex task into a manageable routine. It ensures nothing gets missed and everyone knows what's been done.
| Task | Frequency | Last Completed | Next Due | Notes |
|---|---|---|---|---|
| Daily Group Head Rinse | Daily (End of day) | Run a cleaning cycle without chemicals. | ||
| Milk System Clean | Daily (End of day) | Use approved milk system cleaner. | ||
| Descale Cycle | Per machine prompt | Log date and any issues. | ||
| Water Filter Change | Every 6 months | Order replacement filter ahead of time. | ||
| Brewer Unit Deep Clean | Monthly | Remove and rinse the brewing unit. |
This simple framework helps ensure that critical maintenance for the descaling coffee machine process is never missed. It fosters a culture of care that everyone in the office can appreciate with every single cup.
Troubleshooting Common Descaling Challenges
Even when you follow the instructions to a T, machines can sometimes have a mind of their own. The good news? Most issues that crop up after descaling a coffee machine are surprisingly simple to sort out. Think of this as your go-to guide for turning a moment of "what now?" into a quick, confident fix.
Let's walk through the most common hurdles we see and the straightforward solutions that will get your machine back in business without needing to call for backup.
The Warning Light Refuses To Turn Off
This is, without a doubt, the most frequent call we get. It’s incredibly frustrating. You’ve done the work, you’ve run the cycle, but that stubborn little light is still blinking away. Don't panic; it almost never means the descale actually failed.
More often than not, the machine's internal sensors just need a nudge to recognise the job's done. These sensors are designed to detect mineral build-up, and sometimes, a tiny trace of the descaling solution itself can hang around and trick the system.
Before you do anything else, try these simple steps in order:
- Run an extra rinse cycle. Top up the water tank with fresh water and run the entire rinse programme again. Honestly, this is all it takes to flush out the last of the residue and reset the sensor nine times out of ten.
- Perform a full power reset. If a second rinse doesn’t cut it, turn the machine off at the wall socket. Leave it unplugged for at least 60 seconds—this gives the internal memory a chance to fully clear. Then, plug it back in and restart. The old "turn it off and on again" trick is a classic for a reason.
If the light still won't go out after both of these steps, it might point to a genuine sensor fault. At this stage, it’s best to check your machine’s manual or contact your service provider rather than attempting any more fixes yourself.
The Coffee Tastes Slightly Off
You’ve just descaled the machine, so you’re expecting the best coffee of your life. Instead, it tastes… a bit sour? Maybe a little chemical? This is a classic sign that the rinsing phase wasn't quite thorough enough.
The solution couldn't be simpler: rinse, rinse, and rinse again. As we mentioned, running just one rinse cycle is rarely enough. We always recommend running a minimum of two full tanks of fresh water through the machine after any descaling. If you're still noticing an aftertaste, run a third.
It’s impossible to "over-rinse" your machine. Every flush with fresh water just improves the situation, making absolutely certain that every last remnant of the cleaning agent is gone from the pipework. That's what lets the coffee’s true flavour profile shine through.
Unusual Noises After The Descale
Hearing new gurgling, hissing, or clunking sounds right after a descale can be a bit alarming. But these noises are usually just a temporary side effect of the cleaning process and tend to sort themselves out.
The culprit is almost always air pockets trapped in the water lines. The descaling process involves emptying and refilling the system, and it’s easy for a bit of air to get stuck along the way.
Here’s the quick fix:
- Dispense Hot Water: Just run the hot water function for about 30-40 seconds. This forces a steady stream of water through the system, which is usually enough to push out any trapped air bubbles.
- Brew a Couple of Coffees: Making two or three large black coffees back-to-back does the same job, helping purge the air and get things back to normal, quiet operation.
These noises are typically nothing to worry about—it’s just the sound of your machine recalibrating. If they carry on for more than a day, or if you also spot leaks or notice the machine isn't performing well, then it's time to get some professional help.
The Hidden Costs of a Neglected Coffee Machine
Thinking of descaling as just another item on the maintenance checklist is a massive, and costly, mistake. It’s easy to put it off, but the real impact of neglecting your coffee machine goes way beyond a single breakdown. It subtly drains your budget, disrupts your team, and can even chip away at your company culture.
When limescale builds up on your machine's heating elements, it acts like a thick blanket, forcing it to work much harder just to hit the right brewing temperature. Day after day, that extra effort quietly pushes up your energy bills.
The Financial Drain of Downtime
The more obvious costs hit when the machine finally gives up. Emergency call-out fees are never cheap, and sourcing replacement parts for high-performance office coffee systems can be eye-wateringly expensive. But the repair bill is often just the tip of the iceberg.
Think about the ripple effect. Between 2020 and 2023, the British Institute of Cleaning Science (BICSC) reported a startling 15% rise in coffee machine breakdowns. This cost UK businesses an estimated £25 million a year in repairs and lost productivity. That’s a huge figure for something so preventable.
This is why partnering with premium manufacturers that build in descaling reminders is so smart—it can boost a machine’s lifespan by up to 40% and keep that barista-quality taste your team loves. You can dig into more data on professional coffee machine care and its benefits.
When your machine is out of action, productivity takes a direct hit. People start heading out to local coffee shops, breaking their workflow and losing valuable focus time.
The Unseen Impact on Team Morale
Beyond the numbers, there's a serious intangible cost. The office coffee machine is rarely just an appliance. It's the modern-day water cooler—a social hub, a place for a quick mental reset, and a clear signal that the company cares about its team’s well-being.
When that perk becomes unreliable, or starts churning out lukewarm, bitter coffee, it sends a message. It creates frustration, breeds complaints, and can make people feel a little undervalued. In contrast, knowing you can always get a genuinely great cup of coffee reinforces a positive and supportive workplace culture.
Investing a few minutes in a descaling cycle isn't a chore; it's a high-return activity. You're protecting a valuable asset, nurturing a great company culture, and showing your team that quality matters in everything you do.
Ultimately, the small, consistent effort of descaling a coffee machine is an investment, not an expense. It's an investment in your equipment, your operational efficiency, and, most importantly, in the daily experience of your team. In today's competitive world, neglecting it is a false economy you simply can't afford.
A Few Common Descaling Questions
Even with the best guides, a few questions always seem to crop up when you're getting hands-on with machine maintenance. It's completely normal. Getting these details right is what separates a good coffee setup from a great one.
Here are the answers to the most common queries we hear, designed to give you the confidence to keep your machine in peak condition.
Can I Use Vinegar to Descale My Office Coffee Machine?
While it’s a popular trick for the kettle at home, using vinegar in a high-performance office coffee machine is a definite no-go. We strongly advise against it. The acetic acid is just too aggressive for the sophisticated internal components.
Over time, it can degrade sensitive parts like rubber O-rings and metal seals, leading to leaks and costly repairs. On top of that, vinegar leaves behind a powerful aroma and flavour that's incredibly difficult to flush out. An acidic, vinegary note can completely ruin the taste of your coffee for days. Always stick with a professional-grade descaling solution – it's formulated to be tough on limescale but gentle on your machine’s internals.
How Often Should We Descale in a Busy Office?
This is the classic "how long is a piece of string?" question, but there’s a simple answer: it depends on your water hardness and how many coffees you’re making.
There isn't a single magic number, but these are solid guidelines to follow:
- High-Usage, Hard Water Areas: If you're in a hard water region (like much of the South East) and your machine is cranking out over 100 cups a day, you'll likely need to descale every one to two weeks.
- Lower-Usage, Soft Water Areas: For an office in a soft water zone with more moderate use, a descaling cycle every four to six weeks should be plenty.
Honestly, your machine is the best guide. Modern bean-to-cup systems are smart; they track the volume of water that passes through and know exactly when limescale is becoming an issue. Trust the automated prompts—they take all the guesswork out of it.
Acting on those alerts as soon as they appear is the easiest way to guarantee consistently great coffee.
The Descaling Light Is Still On After I Ran the Cycle. What Should I Do?
Don't panic! This is a surprisingly common scenario and is almost always an easy fix. A stubborn warning light rarely means the descale failed. Usually, it just means the machine's internal sensors need a final nudge to recognise the job is done.
Before you reach for the phone, try these two steps in order.
- Run an Extra Rinse Cycle: First things first, fill the tank with fresh water and run one more full rinse cycle. This simple action often flushes out the last tiny traces of descaling solution that might be confusing the sensor.
- Do a Full Power Cycle: If the light is still on, turn the machine off at the wall socket. Give it a full minute before turning it back on. This "hard reboot" allows the internal memory to completely reset and often clears the notification.
If the light is still on after trying both of these tricks, it might point to a sensor fault that needs a professional look. At this stage, it’s best to check your machine’s manual or get in touch with your service provider.
At Ue Coffee Roasters, we believe exceptional coffee is the cornerstone of a vibrant, productive workplace. By bringing the quality of a high street café directly to your office with premium bean-to-cup machines and speciality-grade refreshments, you create an environment where your team feels truly valued. Explore our tailored office coffee solutions and see how you can elevate your workplace culture.