

Master Pour Over Coffee V60: A UK Barista's Guide
Let’s move past the instant granules and automated pods, shall we? The Hario V60 pour over coffee brewer marks a real turning point in the UK's coffee scene—it’s a shift towards mindfulness, craftsmanship, and incredible flavour that puts you in charge.
The Art of Pour Over: A Revolution in UK Coffee
This simple cone brewer has become a fixture in Britain's best speciality cafes and home kitchens for one simple reason: it turns a daily routine into a satisfying craft. It's about connecting with the journey from a single-origin bean to the perfect cup in your hands. It’s a moment of calm and focus.
This hands-on brewing style unlocks a depth and clarity of flavour that machines just can’t replicate. First introduced back in 2005, the Hario V60 has made a massive impact on UK coffee habits by making a precise, manual brew accessible to everyone. Its clever design, featuring a 60-degree cone and distinctive internal spiral ribs, gives you fantastic control over water flow and extraction, resulting in a cleaner, more vibrant cup.
A Cultural Shift in Britain's Brew
This change in brewing habits fits perfectly with the UK's growing obsession with top-quality coffee. It's no secret that we've become a nation of coffee lovers. In fact, a significant portion of the UK now drinks coffee regularly, with many seeking higher quality experiences beyond instant coffee. This isn't just about a caffeine hit; it's a major cultural shift towards appreciating the experience and quality of the brew.
This trend is reflected in our purchasing habits, with a growing percentage of coffee bought as whole bean or ground—a perfect match for manual methods like the V60. This shift underscores the UK's move towards a more discerning coffee culture.
The V60 is just one brilliant example among many different coffee brewing methods enjoyed by coffee fans worldwide. Its special place in the UK comes from its knack for highlighting the delicate, complex notes of high-quality, single-origin beans sourced by UK roasters.
The rise of the V60 isn't just about brewing better coffee; it’s about having a better connection to the coffee. It demands a bit of patience and precision, but in return, you get to appreciate the small details that create an extraordinary experience.
Consider this guide your invitation to embrace that mindful approach. We'll walk you through everything you need to start your own journey into the art of pour over coffee v60, helping you master the techniques that turn simple ingredients into a truly exceptional brew, right in your own kitchen.
Building Your V60 Brewing Toolkit
The journey to an incredible pour over coffee V60 starts with gathering the right kit. This isn’t about splashing out on the most expensive gear you can find; it’s about understanding what each piece does and how it helps you brew a truly superior cup. Putting together a solid toolkit is your first step to turning your kitchen into a brew bar that could rival any speciality café in the UK.
The goal here is simple: control and consistency. These two things are what separate a decent brew from a truly memorable one. Every item in your V60 set-up is designed to help you manage variables like water temperature, flow rate, and extraction time.
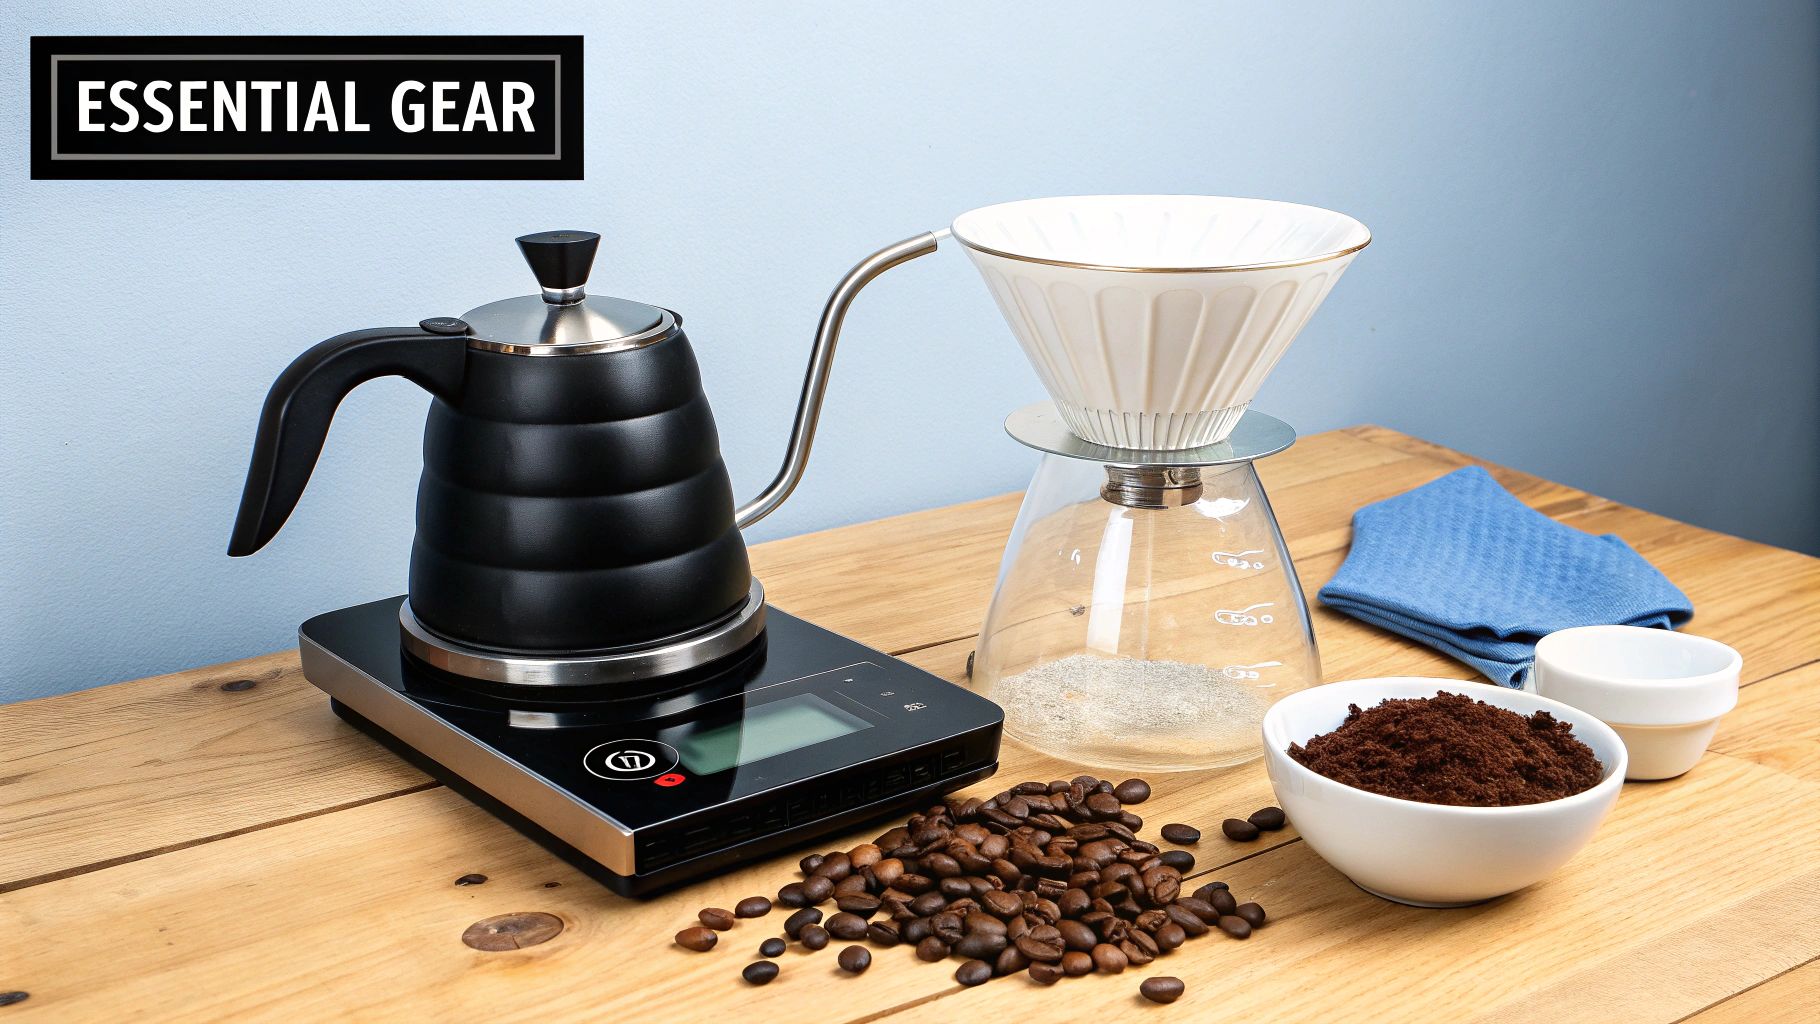
The Non-Negotiables
Let's get straight to the essentials. While you can sometimes find workarounds, these three pieces of equipment are the foundation for brewing exceptional coffee with a V60. Investing wisely here will pay you back in every single cup.
- A Quality Burr Grinder: If there’s one thing to spend your money on, it’s this. A burr grinder delivers a consistent particle size, which is absolutely critical for an even extraction. Blade grinders just smash beans into a mix of dust and boulders, leaving you with a muddled brew that’s somehow both sour and bitter.
- A Gooseneck Kettle: That long, elegant spout isn't just for looks. It gives you incredible control over where you pour and how fast the water flows. This precision is key to gently and evenly saturating the coffee grounds—something that's next to impossible with a standard kettle.
- Digital Scales with a Timer: Great coffee brewing is a science of ratios and timing. Scales let you measure your coffee and water with precision, so you can nail your ideal brew ratio every time. The built-in timer is just as important, helping you track your bloom and total brew time to dial in your technique.
Getting your hands on the right gear is the first hurdle. We've put together a quick breakdown of what you'll need and why it matters.
Essential V60 Brewing Equipment Breakdown
| Equipment | Why It's Essential | UK Market Tip |
|---|---|---|
| Hario V60 Dripper | The heart of the setup. Its cone shape and spiral ribs control water flow for a clean, nuanced extraction. | Start with the classic plastic V60. It’s affordable, durable, and has excellent heat retention. |
| Gooseneck Kettle | Provides the pinpoint accuracy needed to pour slowly and evenly over the coffee bed. | An electric model with temperature control is a game-changer for consistency. Many are available from UK online retailers. |
| Burr Coffee Grinder | Ensures a uniform grind size, which is vital for balanced extraction and avoiding bitter or sour flavours. | Quality hand grinders offer fantastic value, while well-regarded electric models are a solid long-term investment. |
| Digital Scales | Allows for precise measurement of coffee and water (to 0.1g), ensuring consistent and repeatable results. | Many affordable options with built-in timers are available online from UK suppliers. Look for 0.1g accuracy. |
| V60 Filter Papers | Specifically designed for the V60's shape, they ensure a clean drawdown and a sediment-free cup. | Always buy genuine Hario papers (bleached or unbleached). They're designed to fit perfectly and are widely available. |
| Serving Carafe/Mug | A vessel to brew into that's large enough to hold your final coffee volume. | Any heatproof carafe or your favourite large mug will do the job perfectly when you're starting out. |
This kit forms the bedrock of your pour-over practice, giving you all the tools needed to start experimenting and refining your brews.
Choosing Your V60 Dripper
The V60 dripper itself comes in a few different materials, and your choice can have a subtle but real impact on heat retention during the brew.
- Plastic: Often the cheapest and a fantastic starting point for any home brewer in the UK. Plastic V60s are surprisingly good at holding heat and are practically indestructible.
- Ceramic: A classic choice you’ll see in many cafes. Ceramic drippers look great and offer brilliant heat stability once you’ve preheated them properly. They are a bit more fragile, though.
- Metal: Stainless steel or copper models are built to last a lifetime and hold heat extremely well. They’re perfect for travel and consistency but usually come with a higher price tag.
Ultimately, the "best" material comes down to what you value most—be it budget, looks, or durability. A well-brewed coffee from a plastic V60 will always beat a poorly brewed one from a fancy copper dripper.
Lastly, don’t skimp on the filter papers. Stick to the genuine Hario papers made for the V60. Their unique shape and texture are designed to work with the dripper's spiral ribs, promoting a clean flow and delivering that bright, sediment-free cup we're all chasing. With these tools ready, you're all set to get brewing.
A Foundational V60 Brewing Recipe
This is where the real fun begins. If you want to master the pour over coffee V60, you need a solid, reliable starting point. Forget complicated, rigid instructions for now. The goal here is to give you a go-to recipe that works beautifully for almost any bag of beans you can throw at it.
Think of this less as a strict rulebook and more as your blueprint for a consistently delicious cup. Once you’ve got this down, you can start tweaking and tailoring it to your heart's content.
Let's get the core elements dialled in.
The Core Ratios and Temperatures
For a single, satisfying mug of coffee, the 1:16 coffee-to-water ratio is a brilliant place to start. That simply means for every gram of coffee, you'll use 16 grams of water.
My favourite recipe for one person is:
- 20g of coffee
- 320g of water
This ratio hits the sweet spot, giving you a brew with plenty of clarity and body without tasting weak or overpowering. To get it right, you really do need to be precise. If you don't have scales yet, even a set of reliable measuring cups can help you get closer to consistent results.
Next up, water temperature. You’re aiming for water that’s between 92-96°C. No temperature-controlled kettle? No problem. Just boil your kettle, take it off the heat, and let it sit for about 30-60 seconds before you pour. This simple trick stops you from accidentally scorching the coffee.
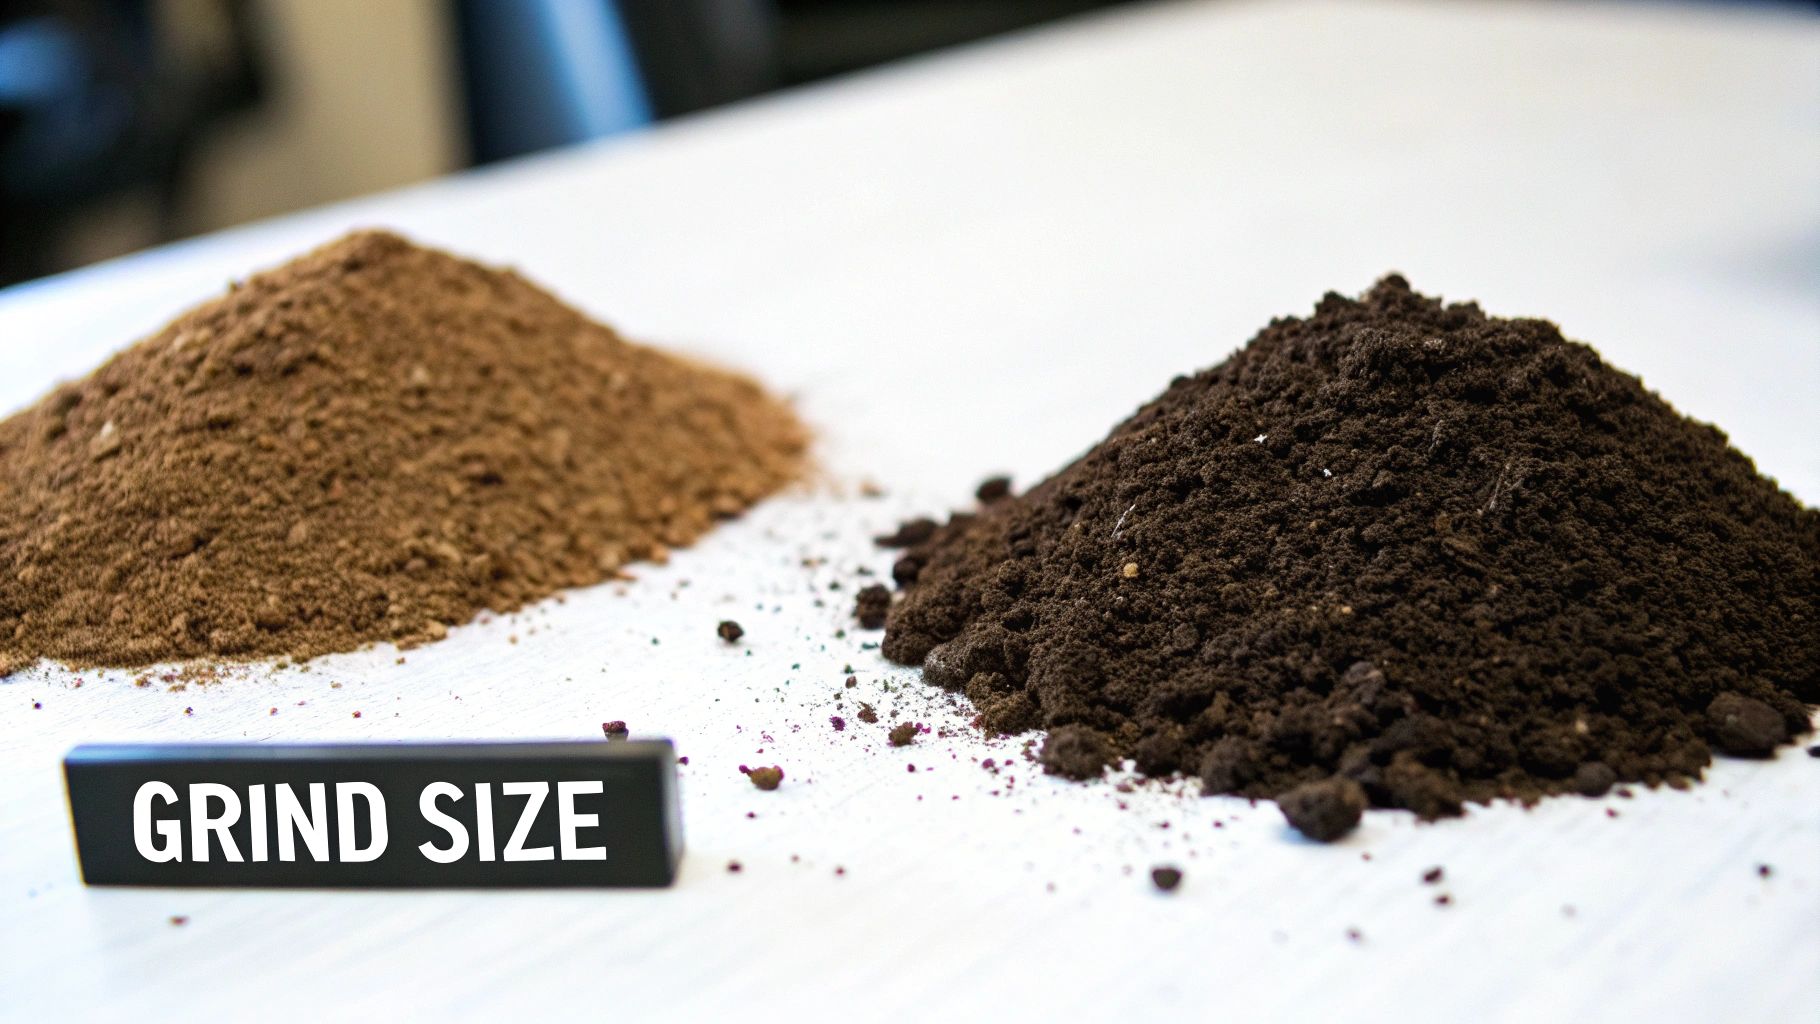
Finally, your grind size should feel like coarse sand. Too fine, and your coffee will taste bitter and over-extracted. Too coarse, and it’ll be disappointingly weak and sour. This is the main variable you’ll play with later on.
Your V60 recipe isn't about hitting exact numbers every single time. It’s about understanding how these variables—ratio, temperature, and grind—work together. Start here, and then trust your taste to guide your adjustments.
The Four Phases of a Great Pour
A great V60 brew unfolds in four distinct stages. Each one is crucial for pulling out all those amazing flavours from the beans. From the moment you first pour to the final drip, the whole process should take roughly 2 to 3 minutes.
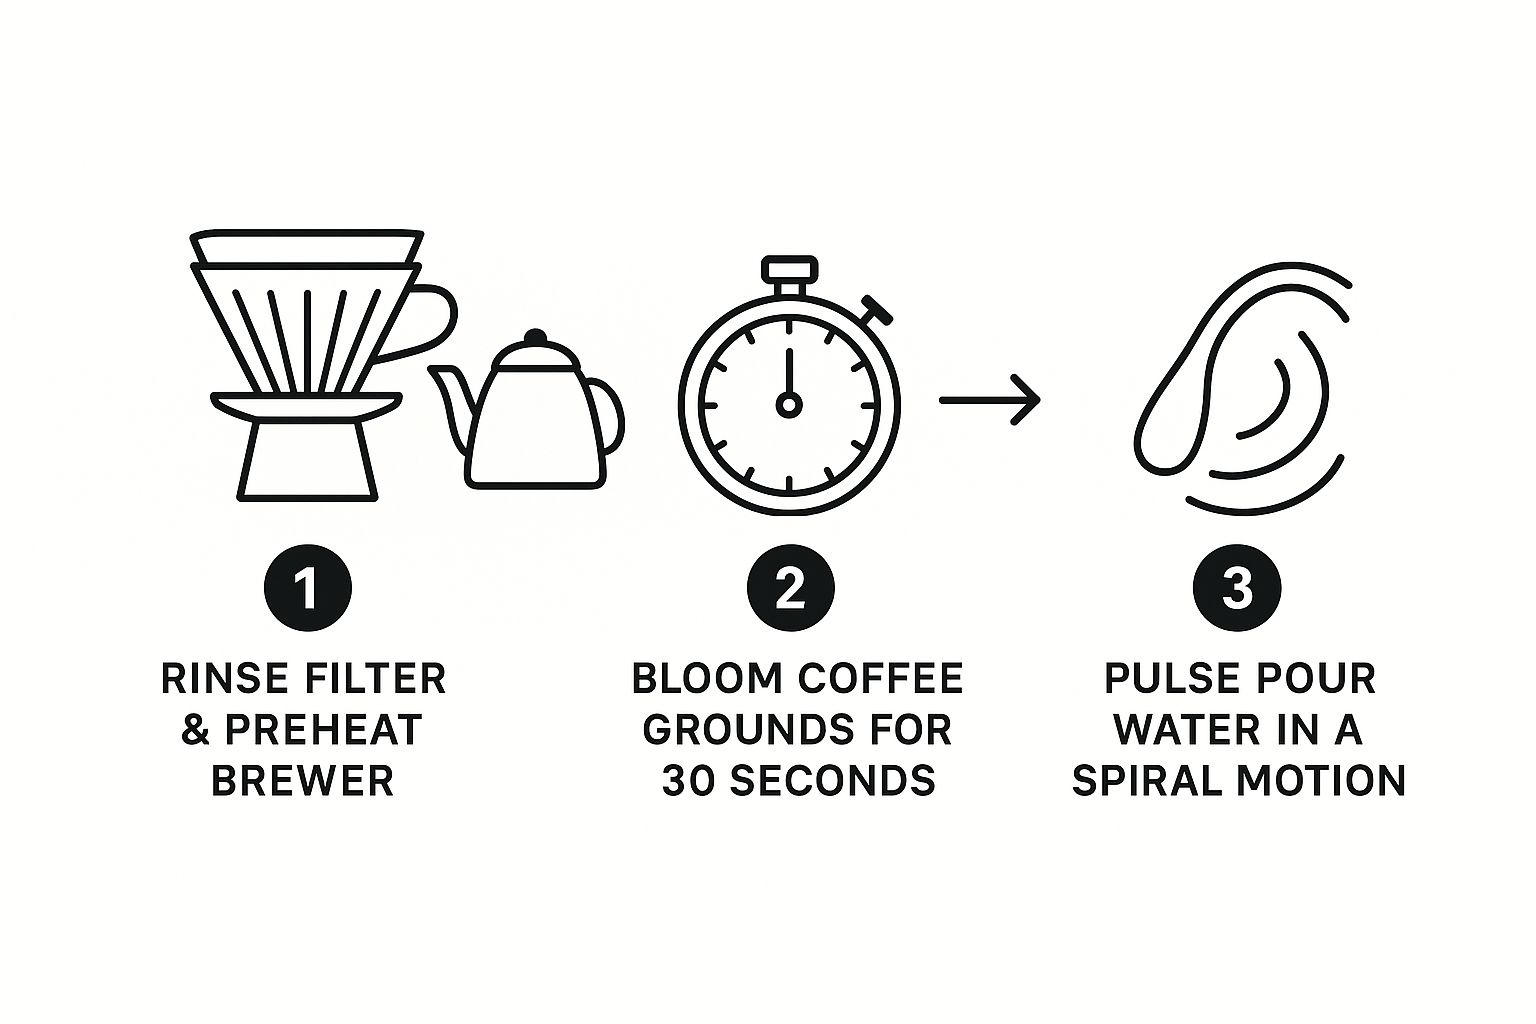
This visual shows just how important those first few moments are. Rinsing the filter and blooming the coffee sets you up for a perfectly controlled and even extraction.
1. The Bloom (0:00 - 0:30)
Get your timer started. Pour double the weight of your coffee in water (so, 40g of water for 20g of coffee) over the grounds. Make sure you saturate everything evenly, then give the V60 a gentle swirl. You’ll see the coffee bed bubble and expand as trapped CO2 escapes. This step, the bloom, is non-negotiable for an even brew.
2. The First Pour (0:30 - 1:00)
At the 30-second mark, it’s time for the main pour. Start pouring slowly and steadily in a circular motion, moving from the centre outwards and back again. Try your best not to pour directly onto the paper filter. Your target is to get the total water weight up to around 180g.
3. The Second Pour (1:00 - 1:30)
As the water level starts to drop, begin your second and final pour. Keep up that same gentle, circular motion until you hit your final target weight of 320g. Using two separate pours like this helps keep the temperature of the slurry stable, which is key for consistent extraction.
4. The Drawdown (1:30 - 2:30)
Now, you just wait. Let all the water drain through the coffee bed. Once the stream slows down to a gentle drip, your pour over coffee V60 is ready. Take a peek at the coffee bed—it should be nice and flat, a sure sign that you’ve achieved an even extraction.
Mastering Your Pouring Technique
Right, this is where science meets art. Your pour is easily the biggest variable you have direct control over in the V60 process, and getting it right can unlock some truly incredible flavours. We’re not just talking about adding water here; we're diving into the techniques that top UK baristas use to fine-tune every cup and get the absolute best out of their beans.
The way you pour has a huge impact on agitation—the movement of the coffee grounds as they mix with the water. A gentle, controlled pour extracts those delicate, nuanced notes, whereas a more vigorous one can build more body and sweetness. You control all of this with the height and speed of your pour.
Height and Speed: The Keys to Agitation
Think of your gooseneck kettle as a precision tool. The distance between its spout and the coffee bed is what dictates the force of the water hitting the grounds.
- A low pour, just a few centimetres above the V60, is your gentle approach. It barely disturbs the coffee bed, which is perfect for those delicate, floral single-origin coffees where you want to preserve every last bit of their fragile aromatics.
- A high pour, maybe 10-15 centimetres up, is far more energetic. This creates more agitation, helping to pull out all those soluble compounds that give a coffee its body and sweetness. This technique can be fantastic for a bean from Central America, where you really want to bring those rich, chocolatey notes to the forefront.
Your pouring speed is just as important. A slow, steady stream keeps the water level consistent and the extraction gentle and even. A faster pour, on the other hand, creates more turbulence. The real skill is being deliberate and consistent with every single movement.
Your pouring technique is a conversation with the coffee. A gentle, whisper-like pour might coax out the subtle floral notes of an Ethiopian Yirgacheffe, while a more assertive, dynamic pour can highlight the deep sweetness of a washed Colombian bean.
Comparing Pouring Methods
There’s no single "correct" way to pour, but two main methods have really taken hold in the UK’s speciality coffee scene. Knowing when to use each one will give you a massive amount of control over the final result in your cup.
The Continuous Spiral Pour
This is exactly what it sounds like: pouring in one long, continuous spiral from the centre outwards and then back in again. You maintain a steady flow rate until you hit your final water weight.
- When to use it: This method is your go-to for consistency. It promotes a really even extraction by keeping the temperature of the slurry stable and making sure all the grounds are saturated uniformly. It's a brilliant default technique that works well for most coffees.
The Pulse Pour
With this technique, you break the main pour into several smaller, separate pours. For instance, after the bloom, you might pour to 150g, let the water drain a little, pour again to 250g, and finish with a final pour to get to your target of 320g.
- When to use it: Pulsing gives you much finer control over both agitation and temperature. It lets the coffee bed settle between each pour, which can result in a cleaner cup with higher clarity. It’s particularly effective for coffees that can turn bitter if they're agitated too much.
To really get a feel for this, try brewing the same coffee back-to-back, using each method once. Pay close attention to the differences in taste and mouthfeel. Does one bring out more acidity? Does the other feel heavier on the palate? This kind of hands-on practice is the fastest way to learn how to pour with purpose and precision.
How to Troubleshoot Your V60 Brew
Even the most dialled-in barista makes a disappointing cup now and then. The real skill isn't brewing a perfect coffee every single time—it's knowing how to read the signs when a brew goes wrong and correct it for the next one. Think of your taste buds as your best diagnostic tool.
Every frustrating brew is just a lesson in disguise. Is your coffee unpleasantly sharp and sour, or is it harsh and bitter? These aren't just vague flavours; they are direct clues pointing to very specific issues in your method. Once you understand the science of extraction, a failed brew becomes your best teacher.
Understanding Extraction: The Root of Flavour
At its core, brewing is simply an act of extraction. You're just using hot water to dissolve tasty compounds from your ground coffee. Almost every common problem comes from getting this timing wrong.
- Under-extraction: This happens when you don’t pull enough flavour from the coffee. The first things to dissolve are the acids, which is why an under-extracted coffee tastes sour, thin, and sometimes even a bit salty. It’s a sign your brew was too quick.
- Over-extraction: This is the opposite problem—you’ve pulled too much out. After you’ve extracted the desirable sugars and oils, the bitter compounds start to come through. This results in a coffee that tastes harsh, dry, and astringent, leaving an unpleasant feeling on your tongue.
Nearly every issue you'll encounter with a pour over coffee V60 can be traced back to one of these two culprits. The trick is figuring out which one it is and knowing which variable to tweak.
A sour brew means you need to extract more; a bitter brew means you need to extract less. Every single adjustment you make—to your grind size, water temperature, or pouring time—is an attempt to find that perfect sweet spot in the middle.
V60 Flavour Fault Finder
Let's turn those abstract ideas into practical fixes. The next time you brew a cup that just doesn't taste right, use this chart as your guide. It’s designed to help you connect the flavour in your cup to a clear, actionable solution you can try on your very next brew.
| If It Tastes... | The Likely Problem Is... | How to Fix It |
|---|---|---|
| Sour or Acidic | Under-extraction. Your brew finished too quickly, not allowing enough time to dissolve the coffee's sweetness. | Grind finer. This increases the surface area and slows the water down, allowing for more extraction. |
| Bitter or Harsh | Over-extraction. The water spent too much time in contact with the grounds, pulling out unwanted bitter notes. | Grind coarser. This will speed up the water flow, reducing the total contact time and extraction. |
| Weak and Watery | Insufficient coffee or severe under-extraction. The coffee-to-water ratio might be off, or the grind is far too coarse. | Check your ratio. Start with a 1:16 ratio (e.g., 20g coffee to 320g water). If that's correct, then grind finer. |
| Muddy or Silty | A choked filter bed. The grind is likely too fine, causing tiny particles to clog the paper and stall the brew. | Grind coarser. Also, make sure your pouring technique is gentle to avoid pushing the finest particles to the bottom. |
By learning to spot these key flavour faults, you're no longer just following a recipe; you're actively engaging with the process. This is how you develop a real barista's intuition and make every cup better than the last.
Your V60 Questions Answered
When you're just getting started with the V60, a few questions are bound to pop up. It’s completely natural. So, we've gathered some of the most common queries we hear in UK coffee shops and online forums to give you clear, practical answers.
Think of this as your go-to guide, cutting through the noise so you can brew with a bit more confidence.
What Is the Best Coffee for a V60?
For a V60, light to medium roast single-origin beans are where the magic really happens. The brewer’s design is incredible at highlighting delicate, nuanced flavours—think bright citrus, sweet berry, or fragrant floral notes that often get lost in darker roasts.
My best advice? Pay close attention to the tasting notes printed on the bags from your favourite UK speciality roasters. If it says something like "notes of jasmine and peach," you can be sure the V60 is the perfect tool to bring those specific flavours right to the front of your cup.
Can I Brew a V60 Without a Gooseneck Kettle?
Absolutely. While a gooseneck kettle gives you incredible precision, you can definitely make a fantastic brew with a standard kettle. It just takes a little more care and a steady hand.
The trick is to pour as gently and slowly as you possibly can. This minimises how much you disturb the coffee bed, which is key to a balanced extraction.
A simple but effective tip is to decant the hot water from your kettle into a small, spouted measuring jug first. This gives you far more control over the flow rate, letting you get started without immediately buying more gear.
This little hack makes the V60 much more accessible, proving you don’t need a full-on barista setup to enjoy brilliant coffee at home. It’s all about working with what you’ve got.
How Much Does a V60 Setup Cost in the UK?
Putting together a brilliant V60 brewing setup in the UK doesn't have to break the bank. You can start with just the essentials and build up your kit over time as you get more into it.
Here’s a rough idea of the starter costs you can expect to see on the UK market:
- Plastic V60 Dripper: A fantastic and durable starting point, usually costing between £5 and £10.
- Reliable Hand Grinder: A quality hand-crank burr grinder will set you back £40 to £80.
- Digital Scales with Timer: These are essential for consistency and typically cost £15 to £25.
- Basic Gooseneck Kettle: You can find a non-electric, stovetop model for around £25 to £50.
This accessibility is a huge part of why the V60 has become so popular across Britain. For a pretty modest investment, you can unlock a whole world of flavour and start a genuinely rewarding home-brewing ritual.
At Ue Coffee Roasters, we're passionate about helping you brew the perfect cup. From freshly roasted single-origin beans perfect for your V60 to the essential brewing equipment you need, we have everything to support your coffee journey. Explore our full collection at https://www.uecoffeeroasters.com.